Help Center
Everything you need to know about using EquipPanel. Learn how to manage your equipment, set up QR codes, track maintenance, manage your team, and get the most out of your account.
Getting Started
New to EquipPanel? Start here to learn the basics and get your equipment management system up and running.
Welcome Wizard
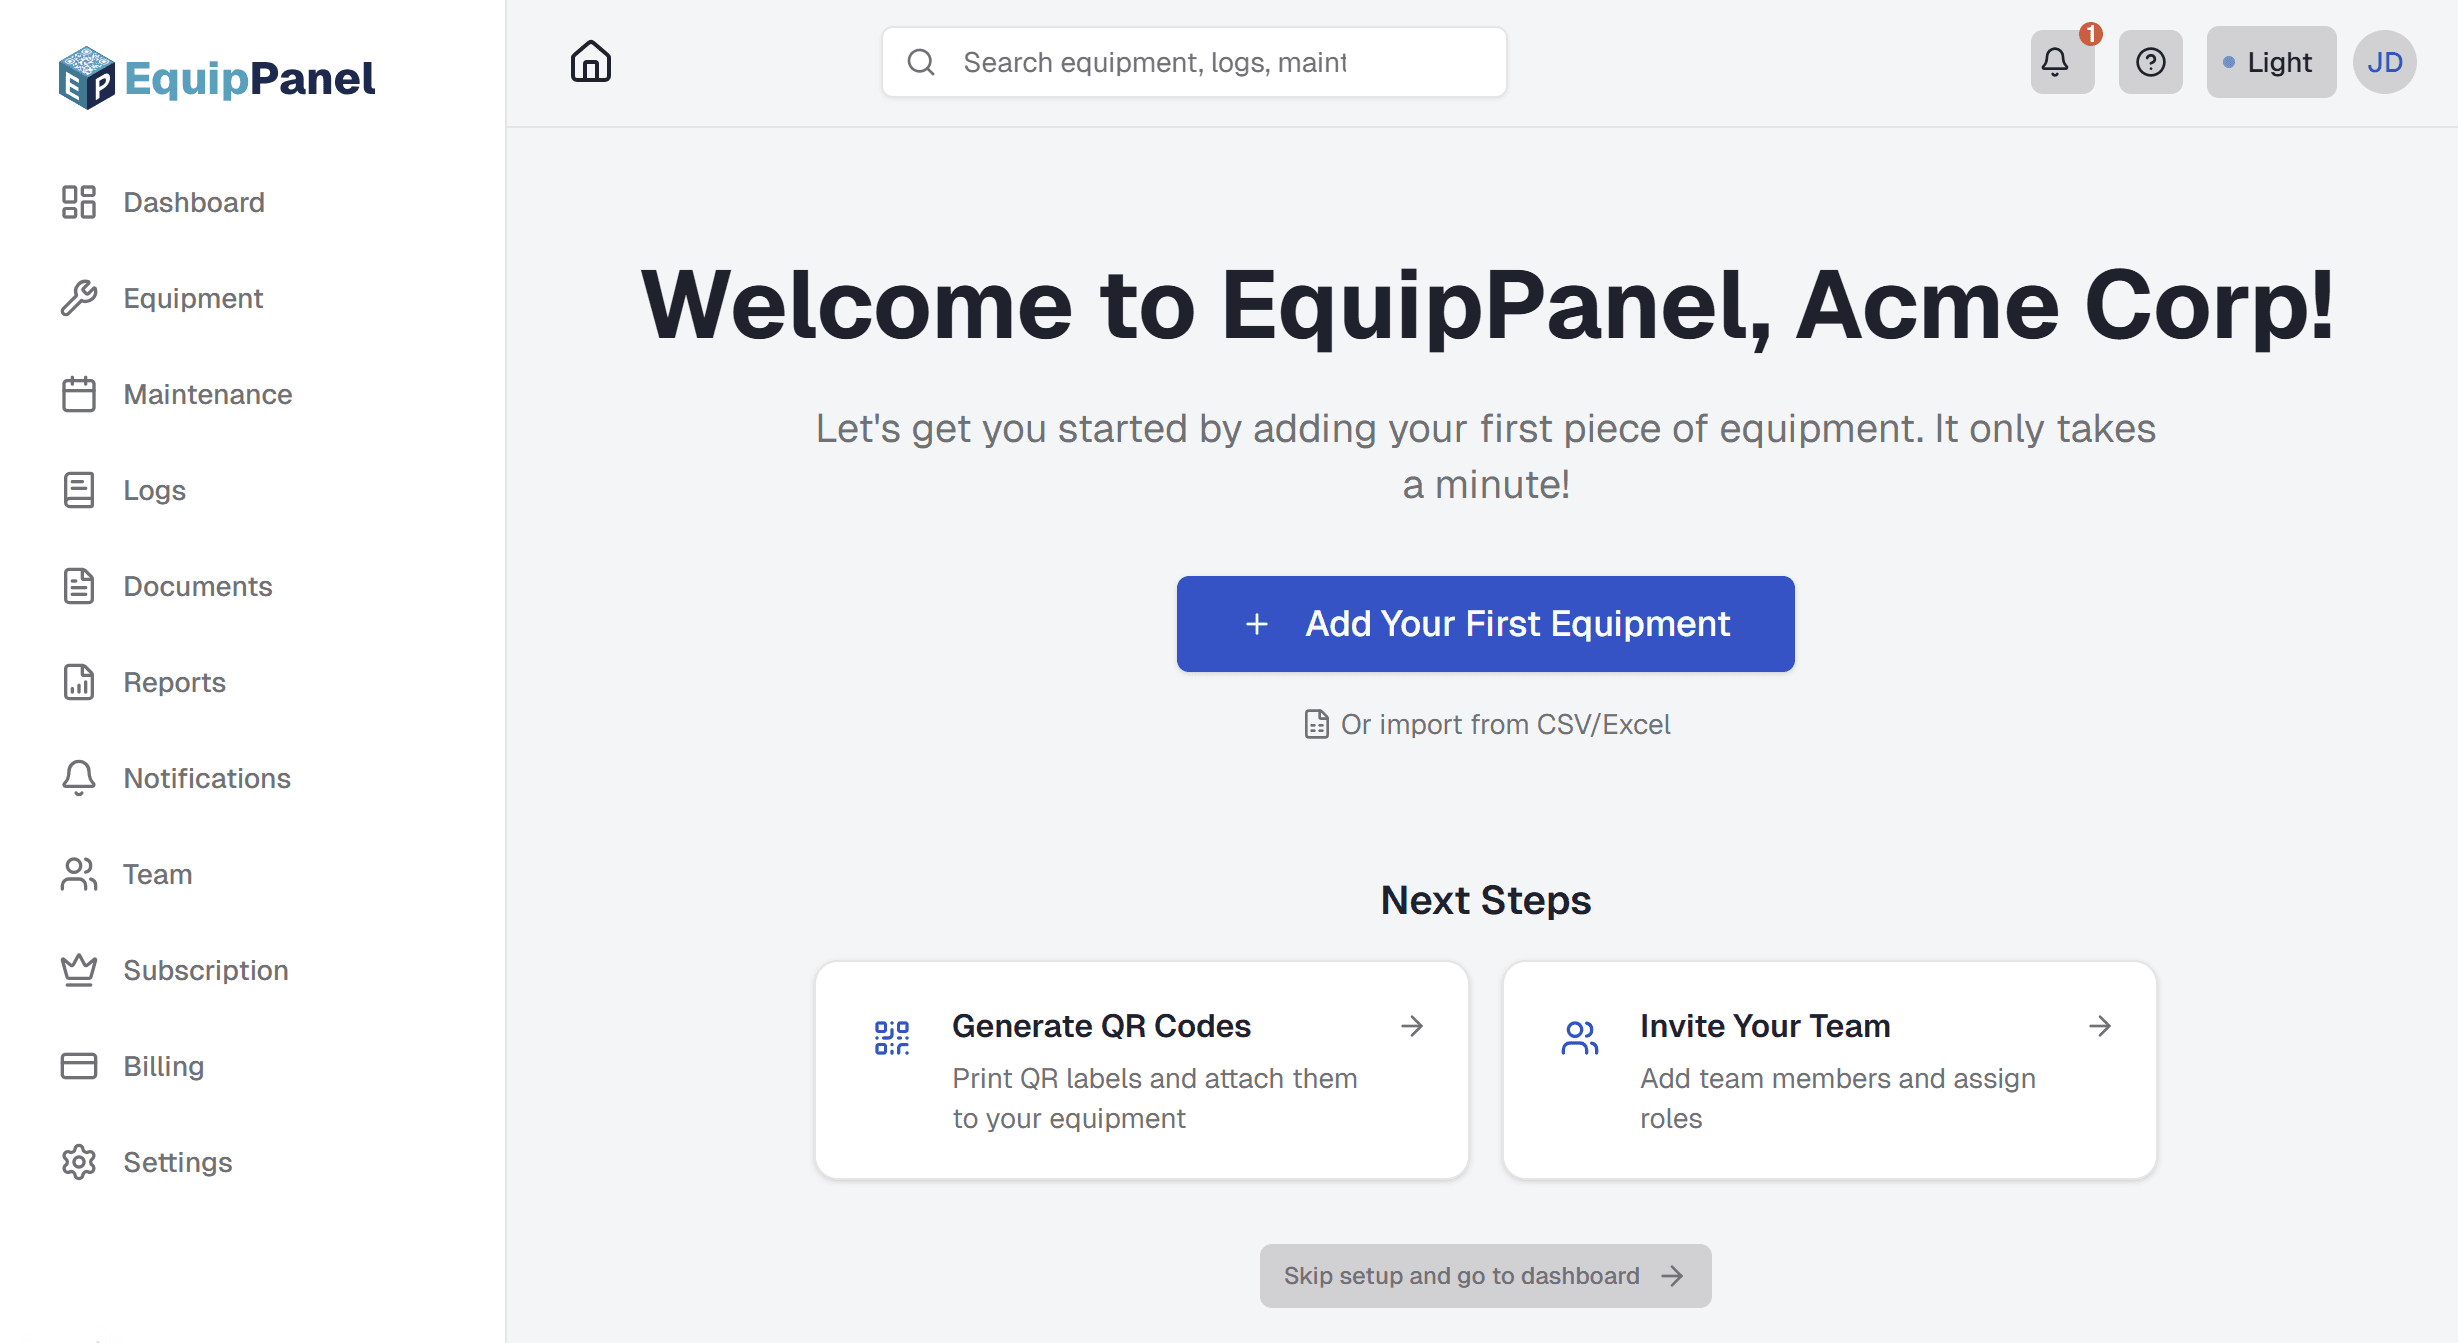
When you first sign up for EquipPanel, you'll be greeted with a welcome wizard that guides you through setting up your account. This wizard helps you get started quickly by walking you through the essential first steps.
The welcome wizard automatically appears when you log in for the first time and don't have any equipment in your account. It's designed to help you:
- Create your first piece of equipment
- Learn about bulk import options if you have many equipment items
- Understand next steps like generating QR codes and inviting your team
- Get familiar with the EquipPanel interface
First-Time User Experience
Here's what happens when you first sign up:
- After creating your account, you'll be redirected to the welcome wizard
- The wizard greets you with a personalized welcome message
- You'll see options to create your first equipment or import multiple equipment at once
- After adding equipment, the wizard shows you next steps (QR codes, team invites)
- Once you complete the wizard, you'll be redirected to your dashboard
Creating Your First Equipment
The welcome wizard makes it easy to add your first equipment:
- Single Equipment: Click "Add Equipment" to create one piece of equipment at a time
- Bulk Import: Use "Bulk Import" to upload multiple equipment from a CSV or Excel file
- Quota Information: The wizard shows your current plan limits before you start adding equipment
Once you add your first equipment, the wizard will guide you to the next steps. You can always add more equipment later from the Equipment page.
Skipping the Welcome Wizard
If you prefer to explore EquipPanel on your own, you can skip the welcome wizard:
- Click the "Skip" button at the bottom of the welcome wizard
- You'll be redirected to your dashboard
- You can always add equipment later from the Equipment page
- The wizard won't appear again once you have equipment in your account
Note: If you skip the wizard and later want to see it again, you can access it by visiting /dashboard/welcome directly, but it will automatically redirect you to the dashboard if you already have equipment.
After Onboarding
Once you complete the welcome wizard (or skip it), you'll have full access to your EquipPanel dashboard. The wizard suggests next steps:
- Generate QR Codes: Print QR code labels for your equipment so your team can quickly access information
- Invite Your Team: Add team members and assign roles (Admin, Operator, or Viewer)
- Explore Features: Check out maintenance scheduling, logs, documents, and reports
You can access these features at any time from your dashboard. The welcome wizard is just a starting point to help you get familiar with EquipPanel's core features.
Create Your First Equipment
Learn how to add equipment to your account, set up custom fields, and upload photos. Get started in under a minute.
Print QR Codes
Generate and print QR code labels for your equipment. Batch export multiple codes at once for easy labeling.
Add Your Team
Invite team members and assign roles. Learn about Admin, Operator, and Viewer permissions.
Search & Filter Equipment
Learn how to quickly find equipment using search, tags, status filters, and location filters.
Related: Equipment Management, QR Codes, Team Management
Equipment Management
Create and manage equipment profiles with all the information your team needs.
Adding Equipment
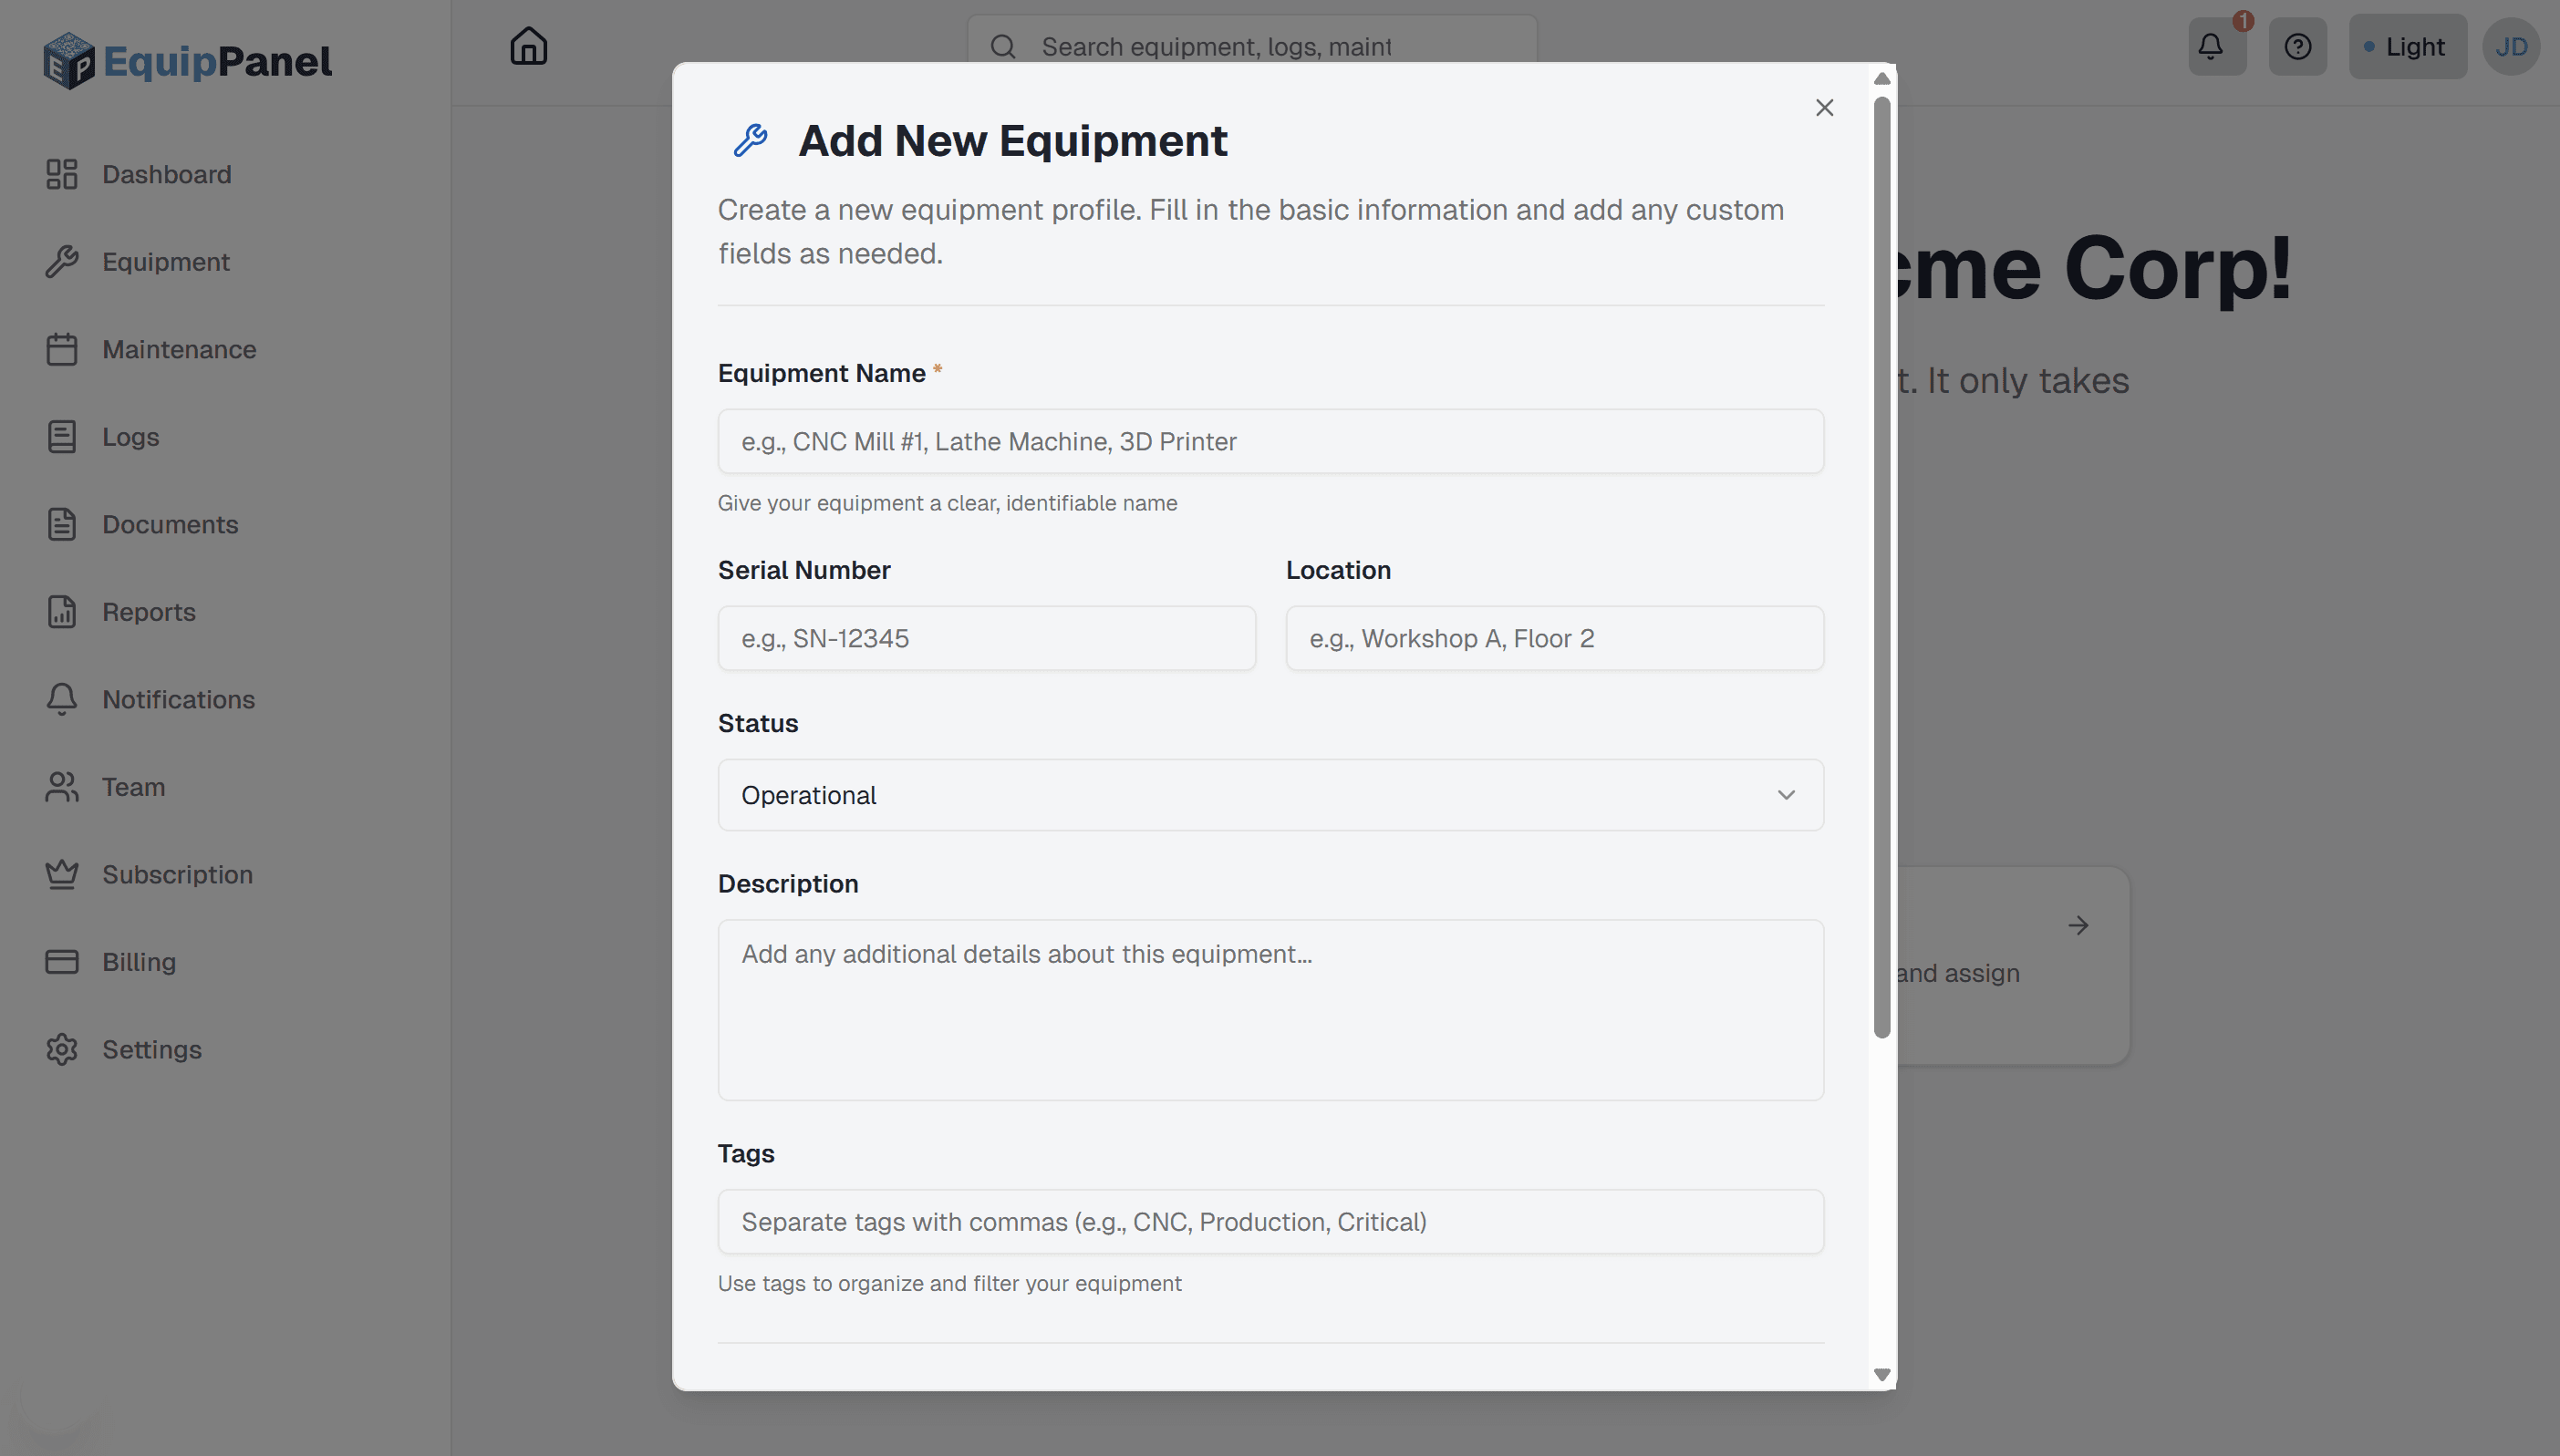
Adding equipment to EquipPanel is quick and easy. Each piece of equipment gets its own digital profile where you can store all relevant information.
- Navigate to the Equipment page from your dashboard
- Click the "Add Equipment" button
- Fill in the basic information: name, serial number, location, and description
- Add tags for easy filtering (e.g., "CNC", "Under Warranty", "Critical")
- Add custom fields if needed (purchase date, warranty expiration, etc.)
- Upload a photo for quick identification
- Click "Save" to create the equipment profile
Editing Equipment
To update equipment information:
- Go to the Equipment page and find the equipment you want to edit
- Click on the equipment card or name to open the equipment profile
- Click the "Edit" button (Admin and Operator roles can edit)
- Update any fields: name, serial number, location, status, tags, custom fields, or photo
- Click "Save" to update the equipment profile
Deleting Equipment
Only Admins can delete equipment. When you delete equipment:
- All associated logs, maintenance schedules, and documents are also deleted
- This action cannot be undone
- Storage space used by the equipment's documents is freed up
To delete equipment, open the equipment profile, click "Delete", and confirm the action.
Custom Fields
Custom fields let you track equipment-specific information that's important to your business. Common examples include purchase date, warranty expiration, calibration dates, or custom identifiers.
To add custom fields, simply click "Add Custom Field" when creating or editing equipment, enter the field name and value, and save.
Equipment Status
Track the current status of each piece of equipment. EquipPanel supports the following status options:
- Operational - Equipment is working normally and ready for use
- In Use - Equipment is currently being used in production or operations
- Idle - Equipment is available but not currently in use
- Needs Attention - Equipment requires maintenance or inspection
- Under Maintenance - Equipment is being serviced or repaired
- Out of Service - Equipment is currently unavailable or decommissioned
Status changes automatically trigger notifications to your team, keeping everyone informed about equipment availability. You can filter equipment by status to quickly find equipment that needs attention or is ready for use.
Equipment Tags
Tags help you organize and filter equipment. Add multiple tags to each equipment for easy categorization:
- Category tags: "CNC", "Welding", "Testing" - group equipment by type
- Status tags: "Under Warranty", "Critical", "Backup" - mark important characteristics
- Location tags: "Building A", "Workshop 2" - if you have multiple locations
- Custom tags: Any tags that help your team organize equipment
Use tags to quickly filter equipment on the Equipment page. You can search by tags or filter by specific tag values.
Equipment Photos
Photos help your team quickly identify equipment. Upload clear photos that show the equipment from a recognizable angle. Photos are automatically optimized for fast loading on mobile devices.
Supported image formats: JPEG (.jpg, .jpeg), PNG (.png), GIF (.gif), WebP (.webp), SVG (.svg)
File size limit: Maximum file size is 5MB per image. Images are automatically optimized for fast loading on mobile devices.
Searching and Filtering Equipment
Find equipment quickly using the search and filter options:
- Text search: Search by equipment name, serial number, location, or tags
- Status filter: Filter by equipment status (Operational, Needs Attention, etc.)
- Location filter: Show only equipment from specific locations
- Tags filter: Filter by one or more tags to find related equipment
- QR scan: Use the QR scanner to instantly find equipment by scanning its QR code
You can combine multiple filters to narrow down your search. The search also works across custom fields, so you can find equipment by any information you've stored.
Bulk Import Equipment
Import multiple equipment at once using CSV or Excel files (Admin only):
- Go to the Equipment page
- Click the "Add Equipment" button and select "Import from CSV/Excel" from the dropdown menu
- Download the template file (CSV or Excel format) if you need a reference
- Fill in your equipment data following the template format
- Upload your completed file
- Review the preview to verify your data and check for any validation errors
- Click "Import" to add all equipment
The import template includes columns for name, serial number, location, description, status, tags, and custom fields. Make sure you have enough quota available for all equipment you're importing. Failed rows are reported with detailed error messages so you can fix and retry.
Bulk Actions
Perform actions on multiple equipment at once to save time. To use bulk actions:
- Go to the Equipment page
- Select multiple equipment by clicking the checkbox on each equipment card
- Use "Select All" to select all equipment on the current page
- Click "Bulk Actions" to see available actions
Available bulk actions:
- Change Status: Update the status of all selected equipment at once (e.g., mark all as "Under Maintenance")
- Export QR Labels: Generate and download QR code labels for all selected equipment as a ZIP file
- Delete Selected: Delete multiple equipment at once (Admin only - this action cannot be undone)
Bulk actions are especially useful when setting up new equipment, updating status across multiple items, or generating labels for a batch of equipment. All bulk actions respect your plan's quota limits.
Exporting Equipment Data
Export your equipment data for backup or analysis using the Reports page:
- Navigate to the Reports page from your dashboard
- Select "Equipment" as the report type
- Choose your filters to select specific equipment (or leave filters empty to export all equipment)
- Customize which fields to include in the report using the field selector (optional)
- Select your export format:
- CSV: Unlimited exports on all plans - includes all equipment data
- Excel: Multi-worksheet reports with professional styling (available on Starter+ plans)
- PDF: Quota-limited exports - includes equipment information, charts, and formatting (available on Starter+ plans)
- Click "Generate Report" and wait for processing
- Download the exported file when it's ready
Exported files include all equipment information including custom fields, tags, and basic statistics. CSV exports are unlimited on all plans and are perfect for data analysis in spreadsheet applications. Excel and PDF exports include detailed equipment information, summary statistics, and optional charts. PDF exports are subject to your plan's monthly export quota. For more details, see the Reports section. Reports.
Related: QR Codes, Documents, Maintenance Scheduling, Notifications
QR Codes
Use QR codes to instantly access equipment information from anywhere in your workshop.
How QR Codes Work
Each piece of equipment automatically gets a unique QR code when you create it. This QR code links directly to that equipment's profile, making it easy for your team to access information instantly by scanning with any smartphone or tablet.
QR codes use high error correction, so they work even if the label gets damaged or worn over time. No app download is required - any device with a camera can scan the QR code.
When someone scans a QR code, they're taken directly to that equipment's profile page with all information, logs, maintenance schedules, and documents immediately accessible.
Downloading QR Codes
You can download QR codes as images for digital use or sharing:
- Go to the Equipment page and open the equipment profile
- Click the "Download QR Code" button in the QR Code section
- The QR code is downloaded as a PNG image file
- Use the downloaded QR code in presentations, documents, or digital displays
Creating QR Code Labels
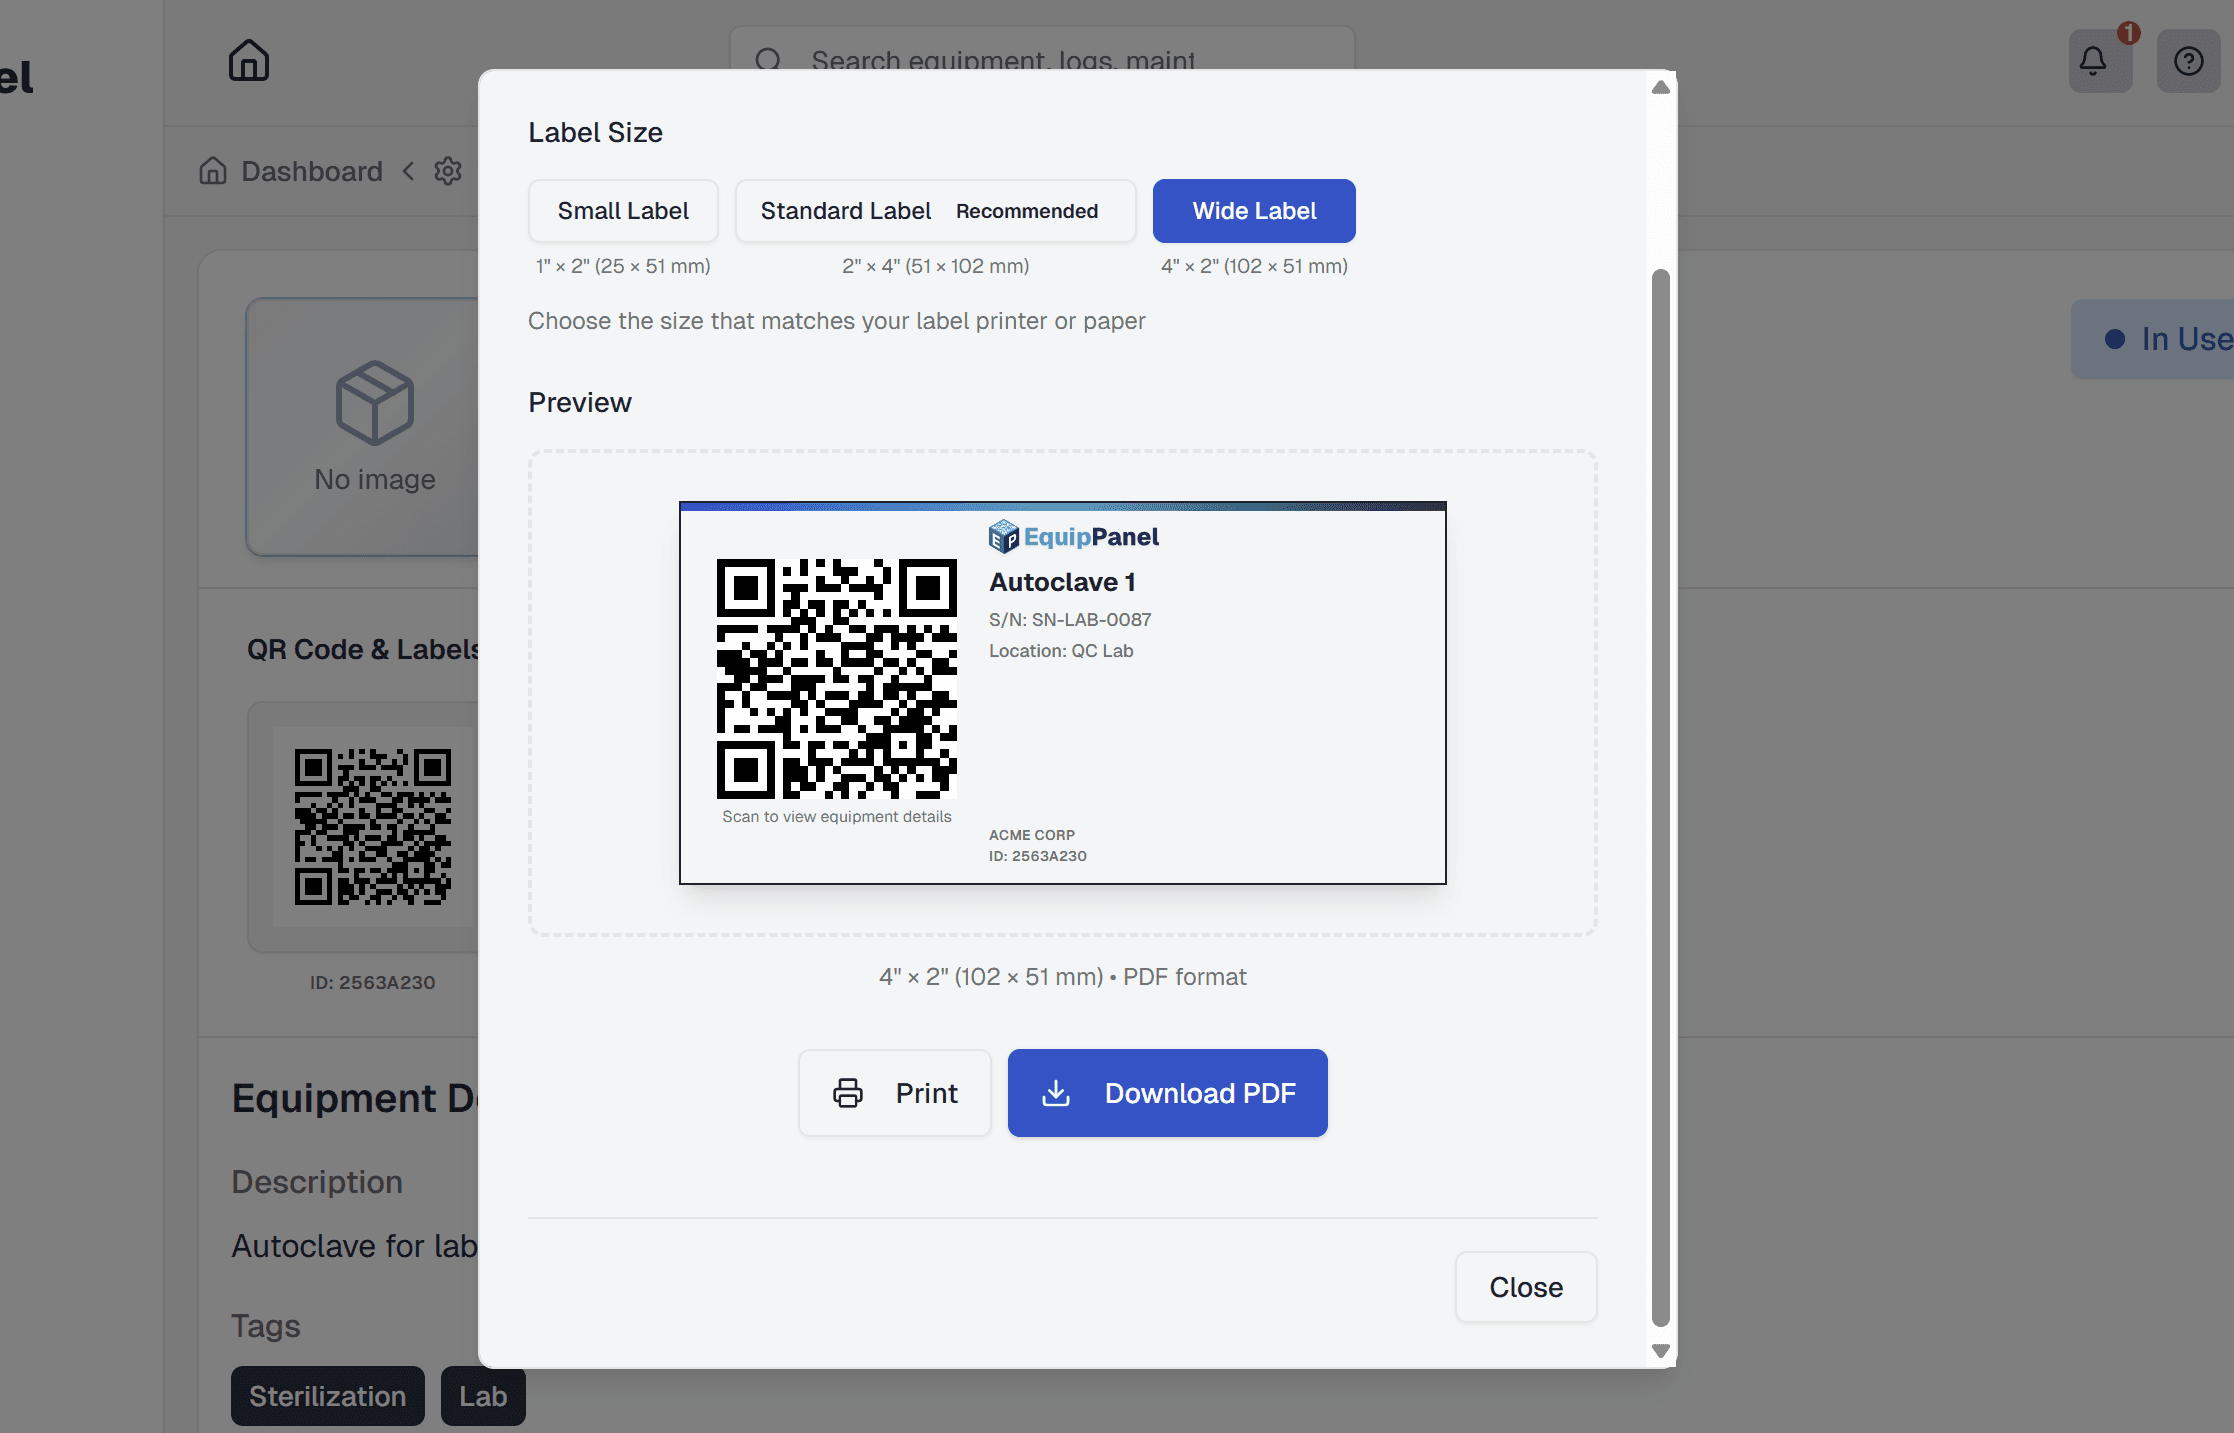
Each equipment can have a professional QR code label that includes the QR code, equipment name, serial number, location, and your company logo. To create a label:
- Go to the Equipment page and open the equipment profile
- Click the "Create Label" button in the QR Code section
- Choose your label settings:
- Label Size: Select from standard label sizes (vertical or horizontal orientation)
- Orientation: Choose vertical (portrait) or horizontal (landscape) layout
- Company Logo: Your company logo is automatically included if you've uploaded one
- Preview the label to ensure it looks correct
- Choose to either:
- Print: Opens a print dialog to print directly to your printer
- Download PDF: Downloads a PDF file that you can print later or send to a label printer
- Print the label on durable, weather-resistant label stock
- Attach the label to your equipment in a visible, protected location
Labels are designed to be professional and durable, with high-contrast QR codes that scan easily even in challenging lighting conditions. The QR code includes error correction, so it remains scannable even if the label gets slightly damaged.
Bulk QR Label Export
Need to print QR code labels for multiple equipment at once? Use the bulk export feature:
- Go to the Equipment page
- Select multiple equipment by clicking the checkbox on each equipment card
- Click "Bulk Actions" and choose "Export QR Labels"
- Choose your label settings (size and orientation) - these apply to all selected equipment
- Click "Export" to generate labels for all selected equipment
- A ZIP file will be downloaded containing individual PDF files for each equipment's label
- Extract the ZIP file and print each label, or send them to a label printer
Bulk export is perfect for labeling new equipment batches or re-labeling multiple equipment at once. Each label in the ZIP file is a separate PDF, so you can print them individually or in batches. All labels use the same size and orientation settings for consistency.
Scanning QR Codes
To scan a QR code and access equipment information:
- Open EquipPanel on your smartphone or tablet
- Use the built-in QR scanner (camera icon) or your device's camera app
- Point your camera at the QR code on the equipment
- The equipment profile opens instantly with all information, logs, and documents
Troubleshooting Damaged Codes
If a QR code becomes damaged or hard to scan:
- Try cleaning the label surface
- Ensure good lighting when scanning
- Hold your device steady and at the right distance
- If the code is unreadable, you can print a new one from the equipment profile

Related: Equipment Management, Logs & Activity
Search Functionality
Find equipment, maintenance, logs, and team members quickly with EquipPanel's powerful search capabilities.
Global Search
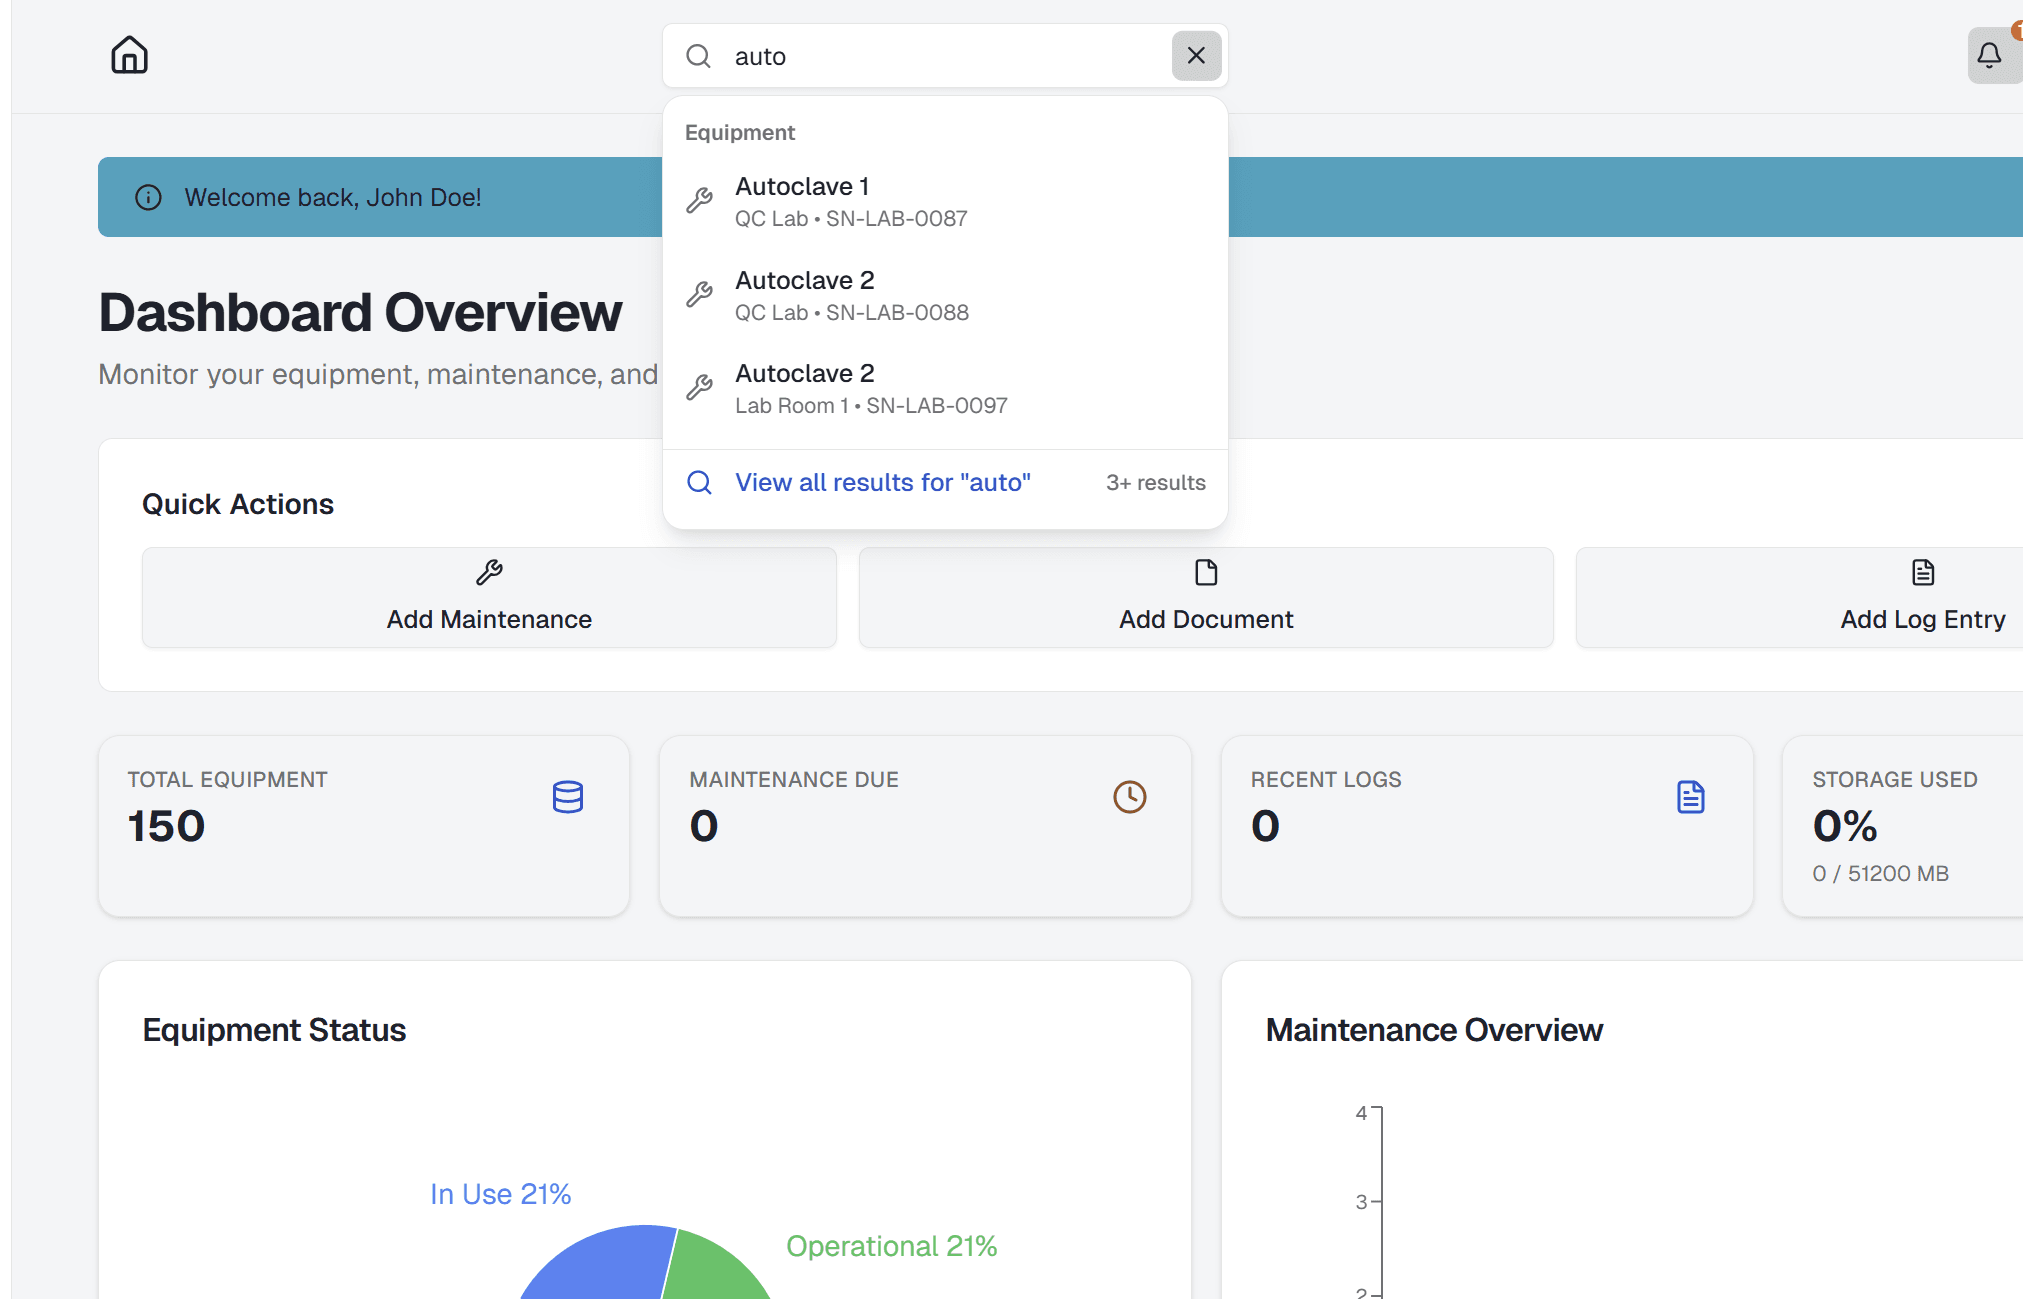
EquipPanel includes a powerful global search feature that lets you quickly find any equipment, maintenance task, log entry, document, or team member from anywhere in the application. The search bar is always accessible in the header of your dashboard.
- Click the search icon in the header (or press Ctrl+K / Cmd+K on Mac)
- Type your search query (minimum 2 characters)
- View instant search results grouped by category
- Click any result to navigate directly to that item
- Click "View all results" to see the full search page
Search results appear in real-time as you type, with results grouped by category (Equipment, Maintenance, Logs, Documents, Team) for easy navigation.
Search Page
For more detailed search results and filtering options, use the dedicated search page:
- Navigate to the Search page from your dashboard (or click "View all results" from global search)
- Enter your search query in the search bar
- View comprehensive results organized by category
- Each category shows up to 20 matching results
- Click on any result to view full details
The search page provides a comprehensive view of all search results across all categories, making it easy to find exactly what you're looking for.
What You Can Search
EquipPanel searches across multiple categories simultaneously:
- Equipment: Search by name, serial number, location, description, or status. Tags and custom fields are searchable on the Equipment page but not in the global search dropdown.
- Maintenance: Search by maintenance title or description
- Logs: Search by log title, notes, log type, priority, status, or location
- Documents: Search by document name or file type
- Team Members: Search by team member name or role
Note: For more advanced searching including tags and custom fields, use the search filters on the Equipment page. The global search focuses on the most commonly searched text fields for quick access.
All searches are case-insensitive and support partial matches, so you don't need to type the exact text. For example, searching for "cnc" will find equipment with "CNC" in the name, serial number, location, or description.
Search Tips and Best Practices
Get the most out of EquipPanel's search functionality:
- Use specific terms: More specific search terms return more accurate results
- Search by serial number: Quickly find equipment by entering its serial number
- Search by location: Find all equipment in a specific location (e.g., "Building A")
- Search by tags: Find equipment with specific tags using the Equipment page filters (tags are not searchable in the global search dropdown, but are searchable on the Equipment page)
- Use keyboard shortcuts: Press Ctrl+K (Windows/Linux) or Cmd+K (Mac) to quickly open search
- Minimum query length: Search requires at least 2 characters
- Real-time results: Results update as you type
Logs & Activity Tracking
Track all equipment activity with detailed logs that include notes, photos, and attachments.
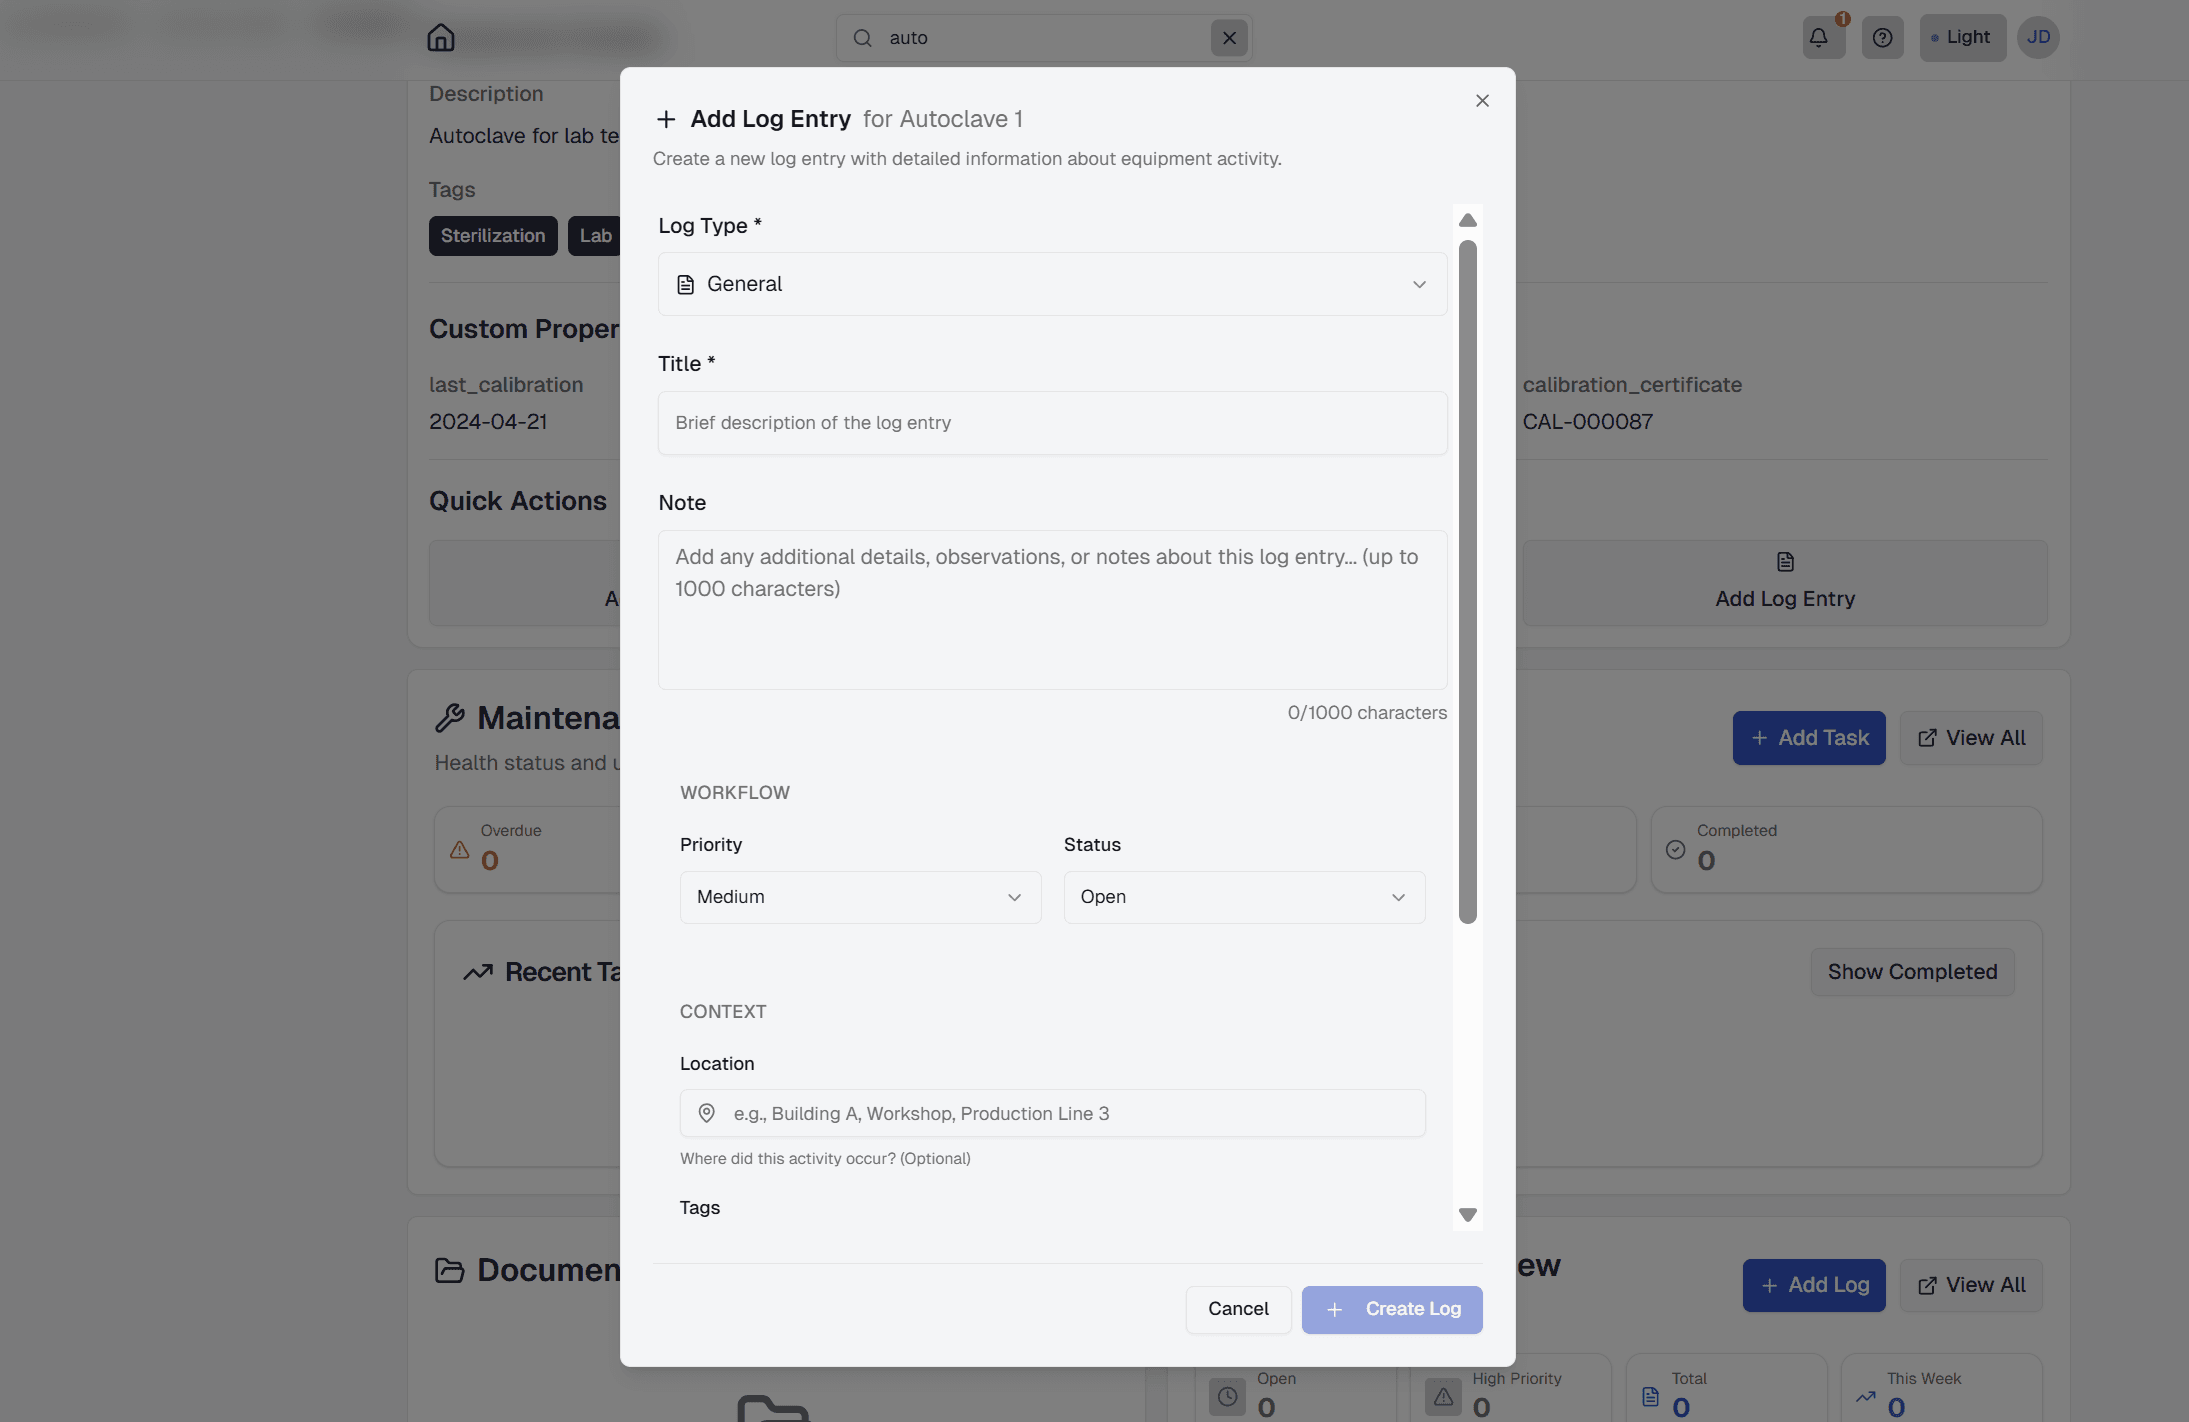
Creating Logs
Logs help you track everything that happens with your equipment. Create logs to record maintenance, incidents, usage notes, or any other important information.
- Navigate to the equipment profile (via dashboard or QR scan)
- Click "Add Log" or the log entry button
- Enter a title and notes in the text fields
- Select a log type (Maintenance, Repair, Inspection, Usage, Incident, or General)
- Add attachments if needed (photos, videos, or files)
- Set priority level if applicable (Low, Medium, High, or Urgent)
- Set status if applicable (Open, In Progress, Resolved, or Closed)
- Optionally add location or tags to the log entry
- Click "Save" to create the log entry
Logs are automatically stamped with the date, time, and the user who created them. High-priority logs automatically trigger notifications to your team.
Log Types
EquipPanel supports different log types to help you categorize and track different kinds of activities:
- Maintenance - Routine maintenance activities, scheduled service, and preventive maintenance
- Repair - Equipment repairs, fixes, and corrective actions
- Inspection - Equipment inspections, safety checks, and compliance audits
- Usage - Equipment usage tracking, operational hours, and utilization notes
- Incident - Equipment incidents, accidents, malfunctions, or unexpected events
- General - General notes, observations, or any other equipment-related information
Log types help you filter and analyze your equipment activity. You can filter logs by type when viewing equipment history or generating activity reports.
Log Priority and Status
Logs support priority levels and status tracking:
- Priority Levels: Low, Medium, High, or Urgent - helps identify which logs need immediate attention
- Status: Open, In Progress, Resolved, or Closed - tracks the lifecycle of log entries
High-priority and urgent logs automatically trigger notifications to your team. You can filter logs by priority or status to focus on what needs attention.
Adding Attachments
Attach photos, images, or documents to log entries to provide visual context or supporting documentation:
- Images: Upload photos or images (JPEG, PNG, GIF, WebP) to document equipment condition or issues
- Documents: Upload PDFs, Word documents, Excel files, text files, or CSV files related to the log entry
- Archives: Upload ZIP or RAR files containing multiple related documents
Supported file types for log attachments:
- Images: JPEG (.jpg, .jpeg), PNG (.png), GIF (.gif), WebP (.webp)
- Documents: PDF (.pdf), Word (.doc, .docx), Excel (.xls, .xlsx), Text (.txt), CSV (.csv)
- Archives: ZIP (.zip), RAR (.rar)
File size limit: Maximum file size is 25MB per attachment. All attachments are stored securely and linked to the specific log entry.
Editing and Deleting Logs
Users can edit or delete their own log entries. Admins can edit or delete any log entry. To edit a log, click on it from the equipment profile and select "Edit". Make your changes and save. To delete, click "Delete" and confirm the action.
Viewing Log History
All logs for an equipment are displayed in chronological order on the equipment profile page. You can filter logs by date range, priority, or user. The most recent logs appear at the top.
Related: Equipment Management, Maintenance Scheduling
Maintenance Scheduling
Never miss a maintenance task with automated scheduling and reminders.
Creating Maintenance Schedules
Set up maintenance schedules to ensure your equipment receives regular service and stays in good working condition. You can create maintenance schedules from the Maintenance page or directly from an equipment profile.
- Go to the Maintenance page from your dashboard (or open an equipment profile)
- Click "Add Maintenance Schedule"
- Select the equipment that needs maintenance
- Enter a title and description for the maintenance task
- Choose the maintenance type (inspection, service, calibration, etc.)
- Set the frequency (one-time or recurring)
- Enter the next due date
- Add any notes or instructions for the maintenance technician
- Save the schedule
Once saved, the system automatically creates the first maintenance occurrence and schedules future occurrences for recurring maintenance.
Setting Recurring Maintenance
For equipment that needs regular maintenance, set up recurring schedules:
- Choose "Recurring" when creating the schedule
- Select the interval (daily, weekly, monthly, quarterly, annually, or custom)
- The system automatically creates future maintenance occurrences based on the interval
- You'll receive reminders before each scheduled maintenance
Maintenance Reminders
EquipPanel automatically sends reminders for upcoming and overdue maintenance:
- In-app notifications: See maintenance due dates on your dashboard
- Email notifications: Receive email reminders (configurable in settings)
- Dashboard alerts: Overdue maintenance is highlighted in red
- Upcoming maintenance: Shown in yellow/orange before the due date
You can customize notification preferences in your account settings.
Marking Maintenance as Done
When maintenance is completed:
- Go to the Maintenance page
- Find the maintenance occurrence you completed
- Click "Mark as Done" or "Complete"
- Optionally add notes about what was done
- The system automatically schedules the next occurrence (for recurring maintenance)
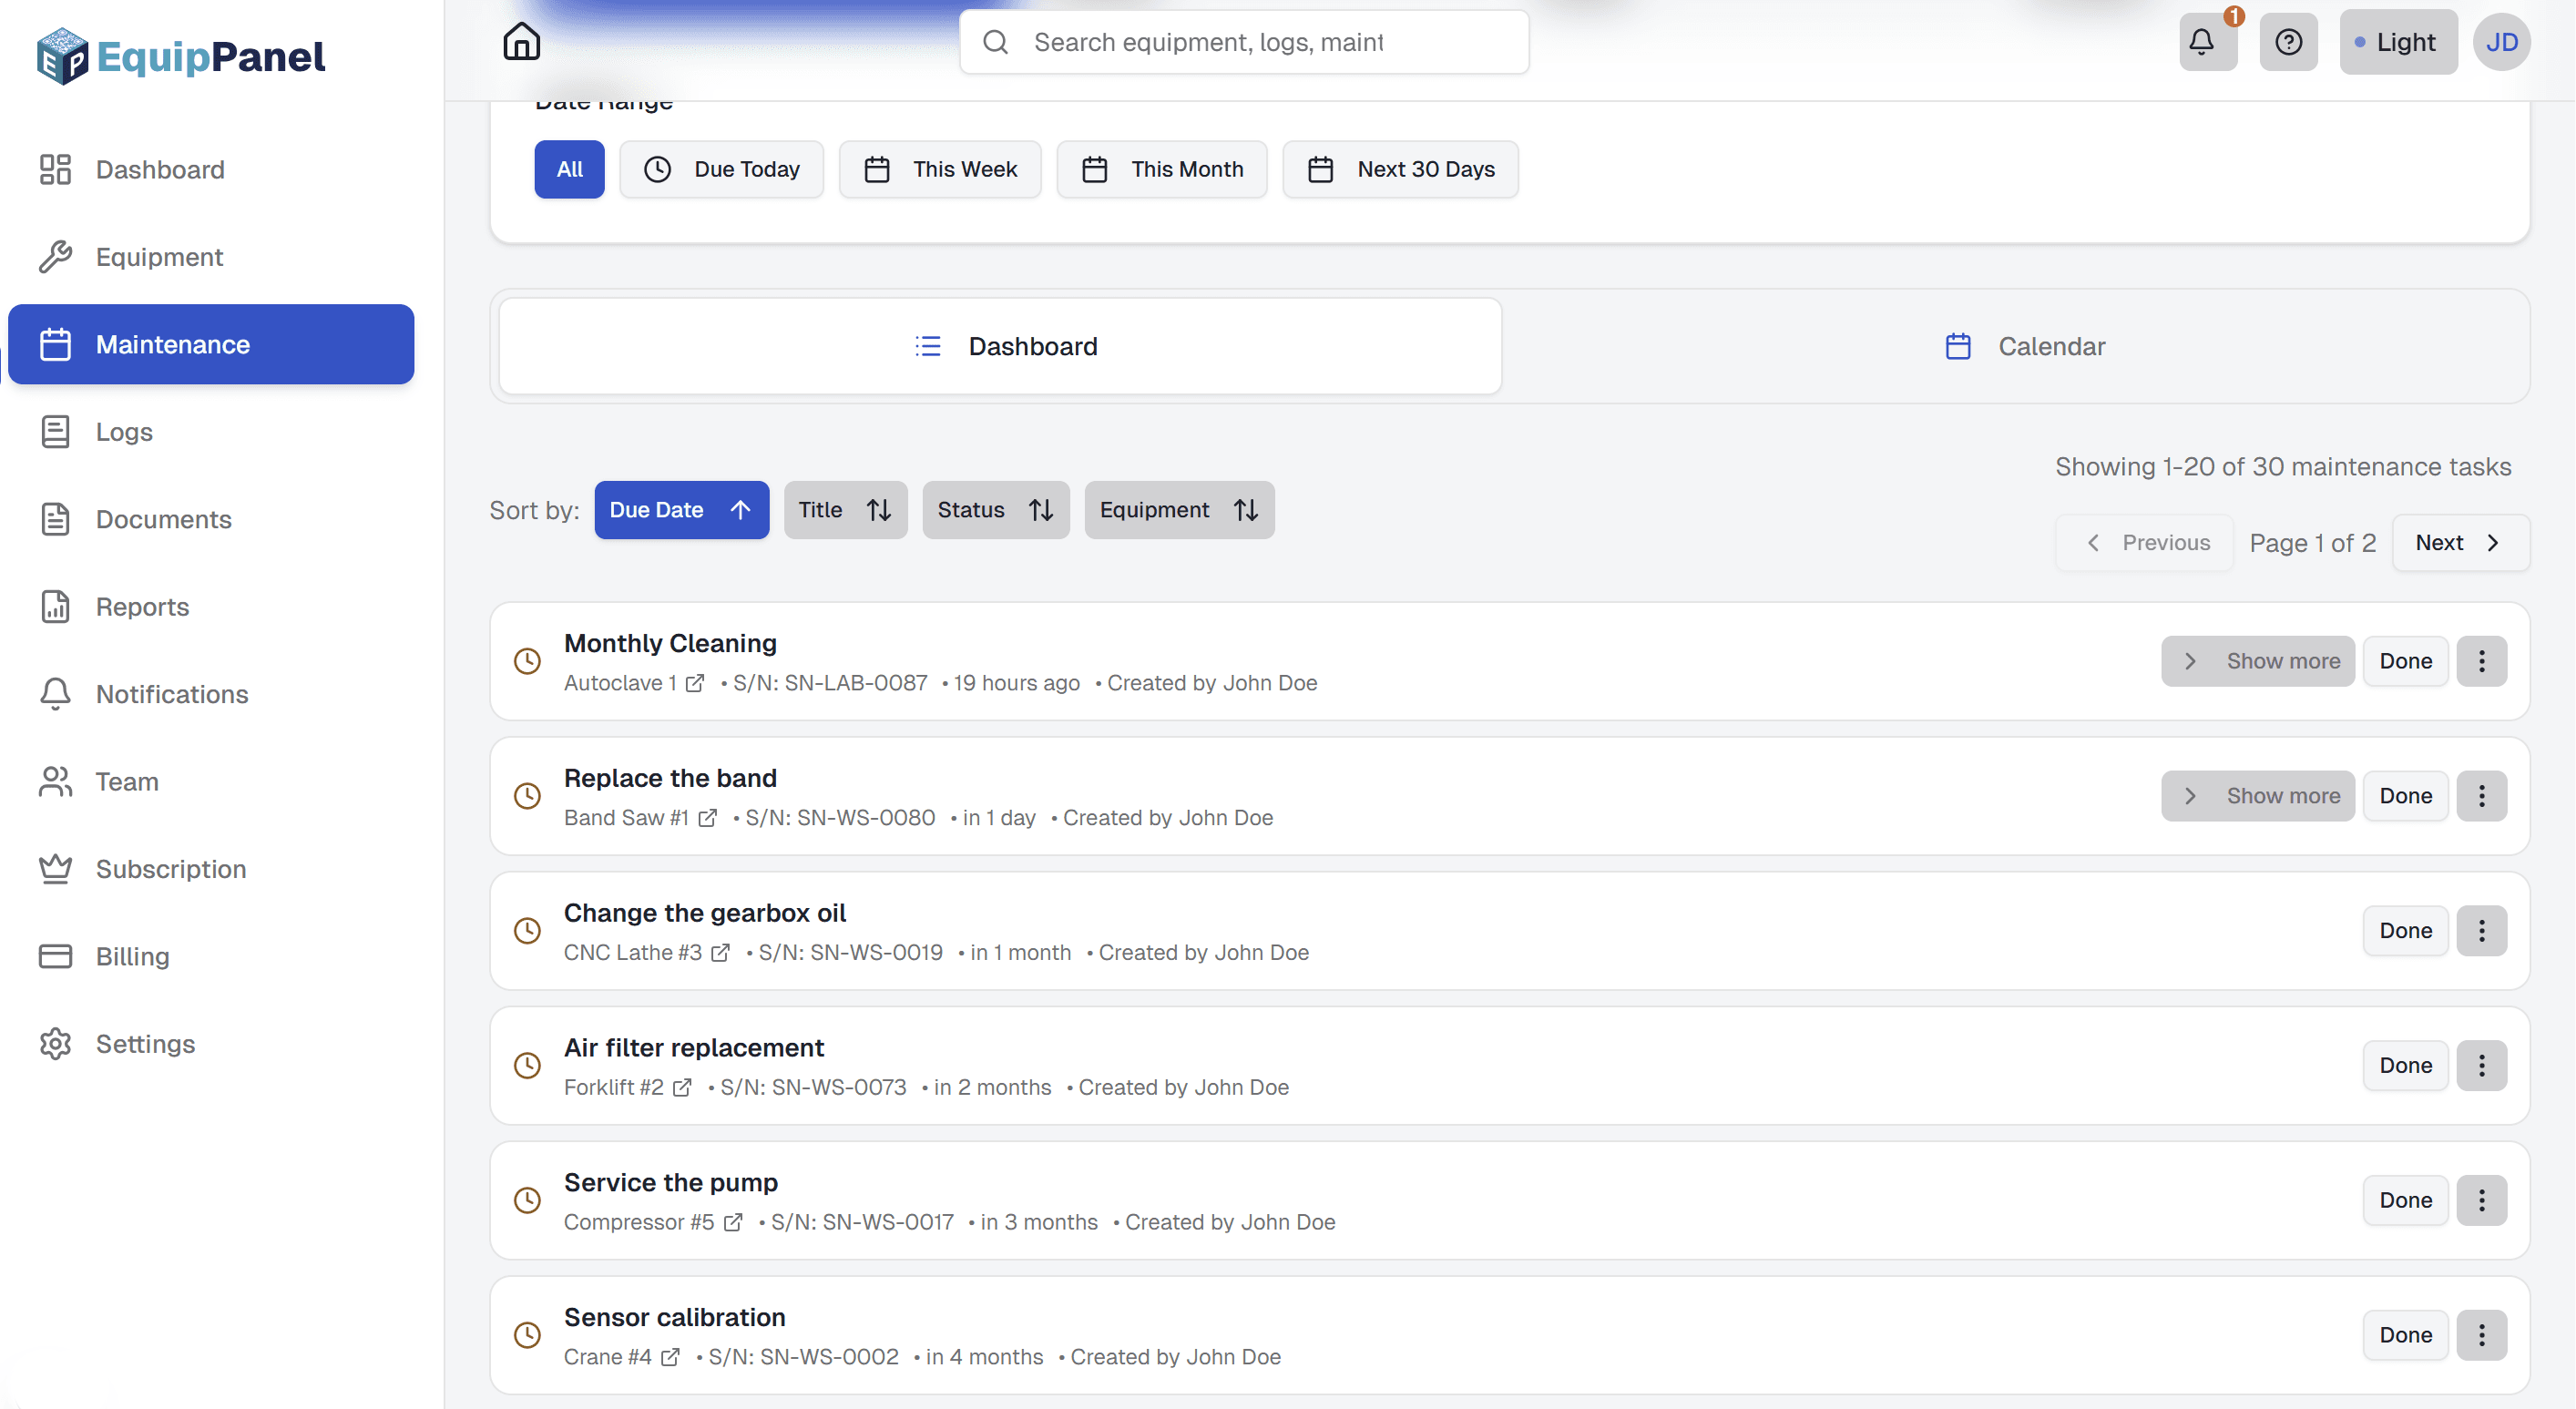
Maintenance Dashboard
The Maintenance Dashboard provides a comprehensive overview of all maintenance tasks across your equipment:
- Overview Tab: See all maintenance tasks organized by status (scheduled, overdue, completed)
- Calendar View: Interactive monthly calendar showing maintenance tasks by date with color-coded indicators
- Statistics Tab: Analytics including completion rates, overdue analysis, machine performance, and monthly overview
- Search & Filtering: Search across maintenance titles, machine names, and serial numbers; filter by status or machine
- Quick Actions: Add new maintenance, mark tasks as complete, and view task details directly from the dashboard
The dashboard helps you stay on top of all maintenance activities, identify overdue tasks, and track completion rates across your entire equipment fleet.
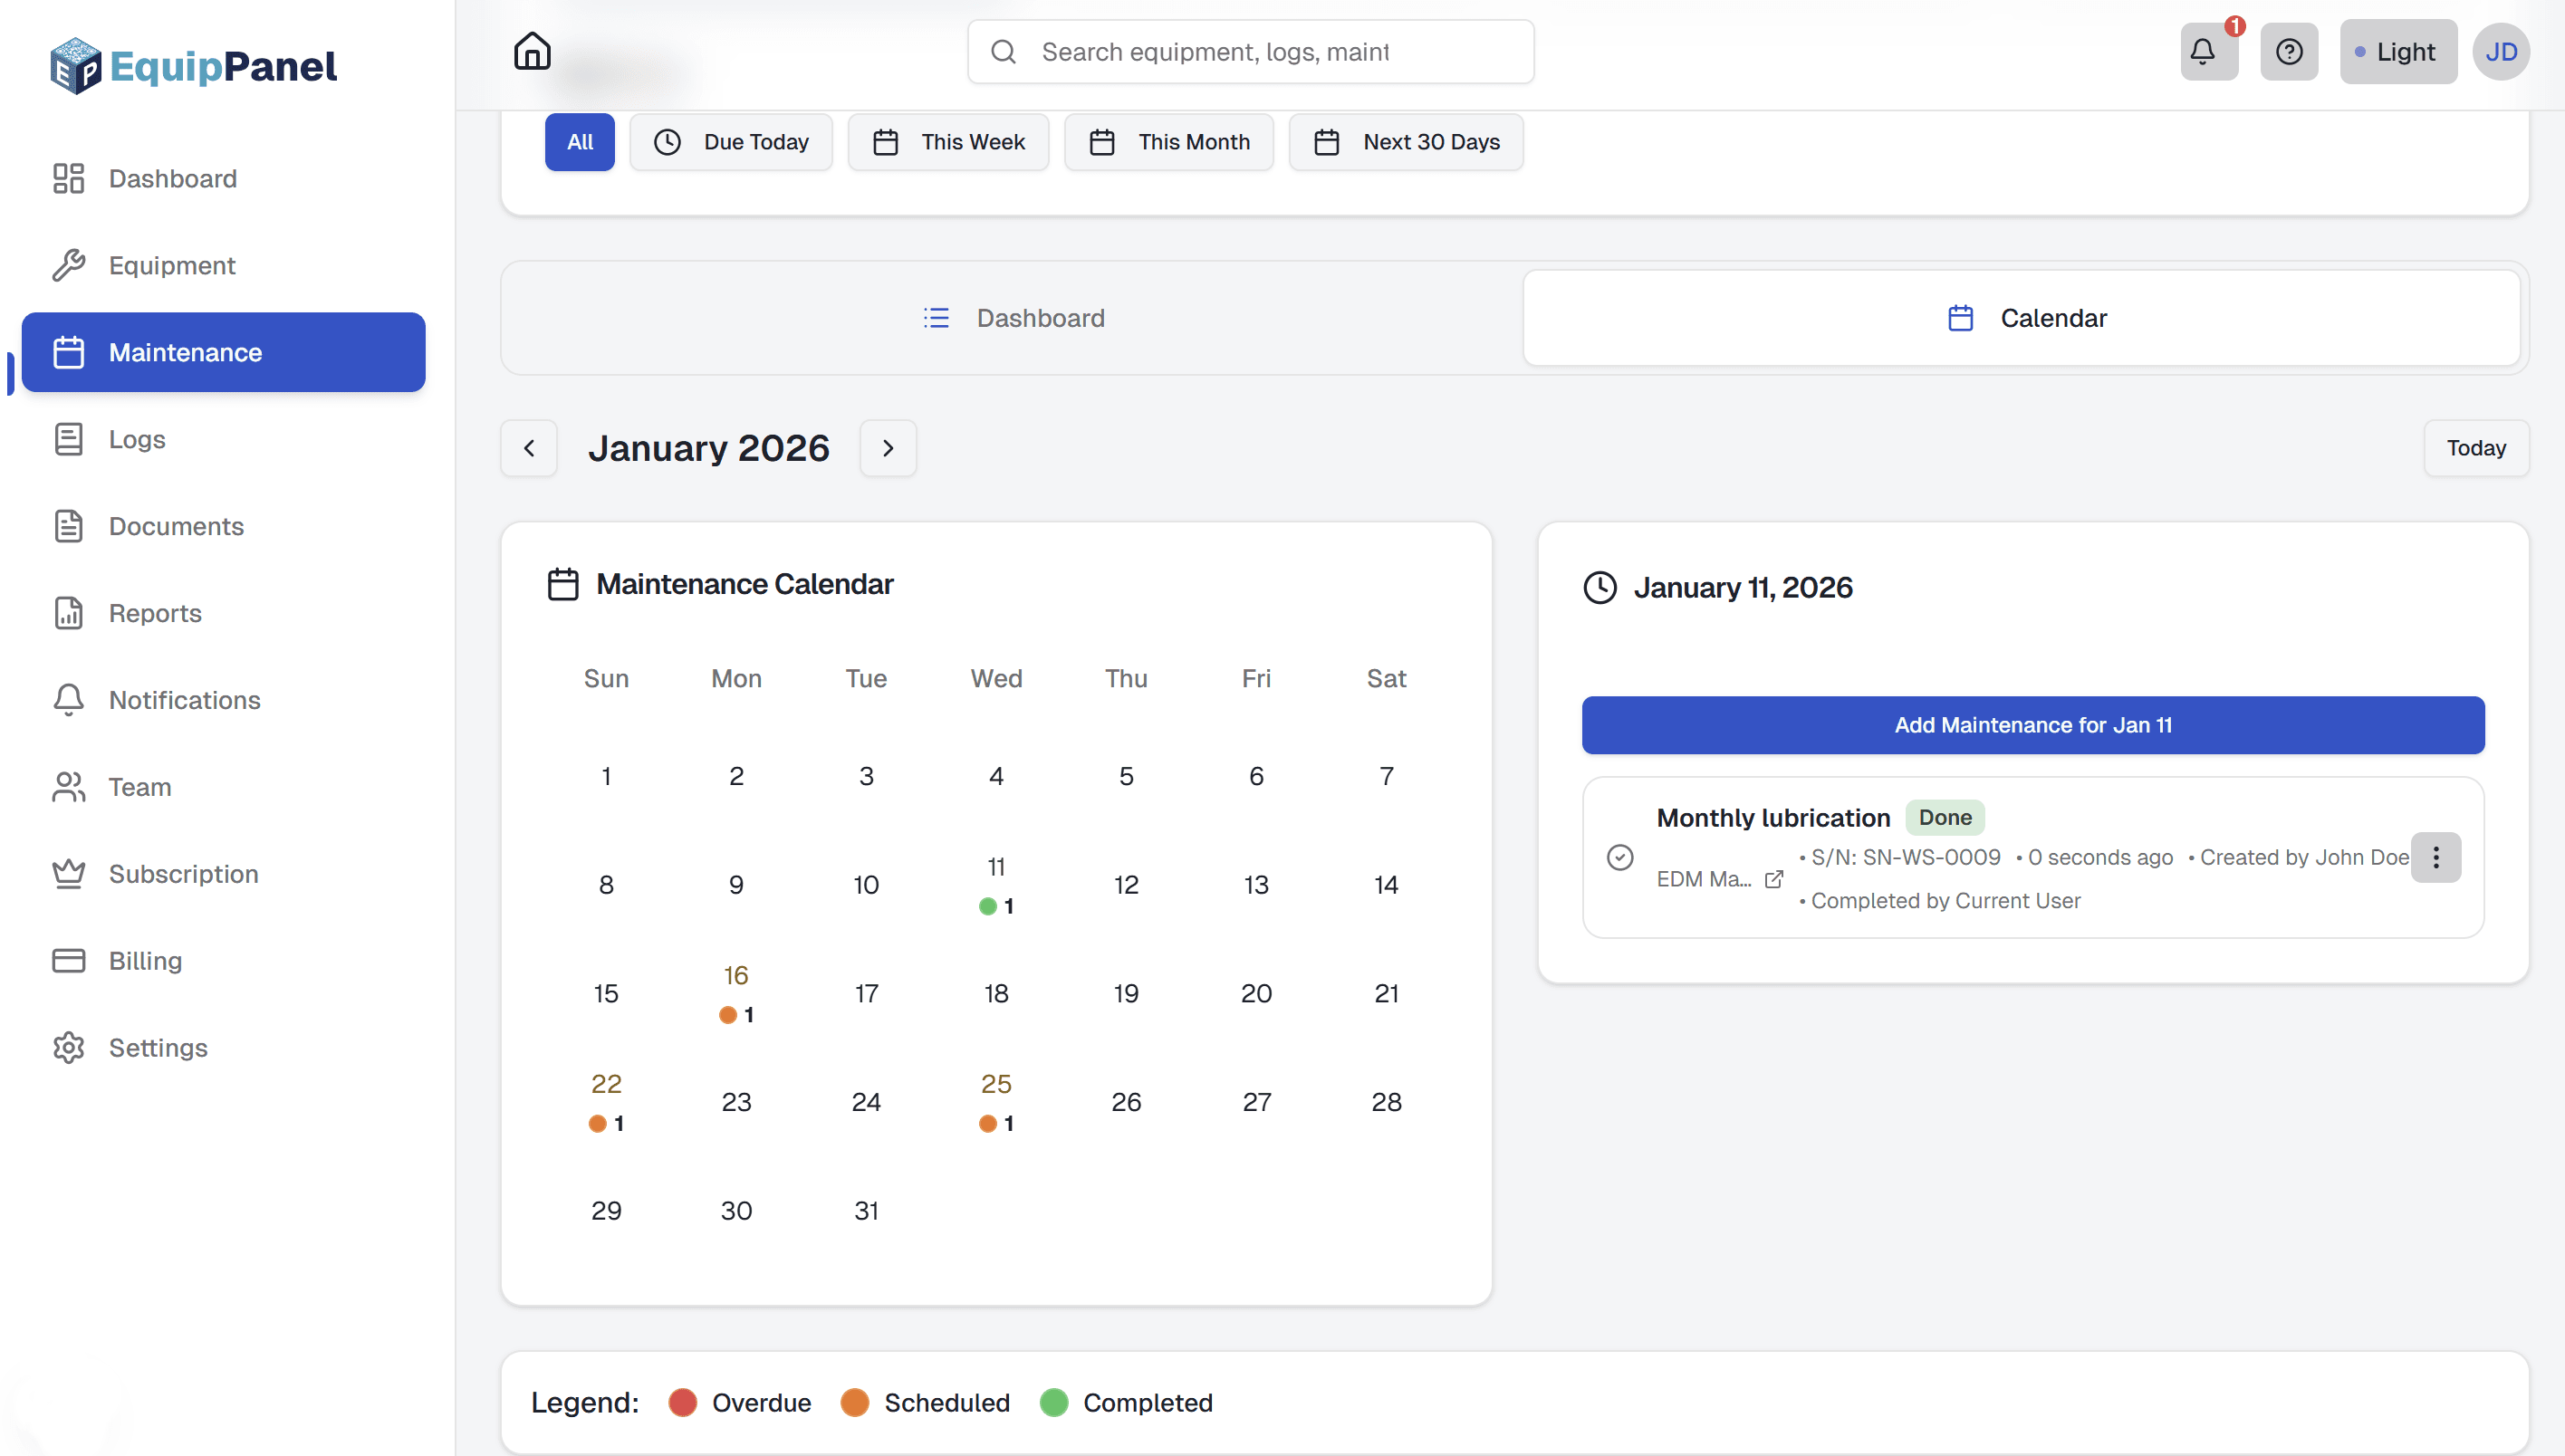
Calendar View
The calendar view provides a visual representation of your maintenance schedule:
- Monthly Overview: See all maintenance tasks for the current month at a glance
- Color-Coded Indicators: Visual dots show task status (overdue in red, scheduled in yellow/orange, completed in green)
- Date Selection: Click on any date to view detailed maintenance tasks for that day
- Easy Navigation: Navigate between months and quickly jump to today's date
The calendar view makes it easy to plan maintenance activities and see upcoming tasks at a glance.
Statistics & Analytics
Track your maintenance performance with comprehensive statistics:
- Completion Rates: Track what percentage of maintenance tasks are completed on time
- Overdue Analysis: Monitor overdue maintenance trends and identify equipment that needs attention
- Machine Performance: See which machines have the most maintenance tasks
- Monthly Overview: View current month statistics including tasks due, completed, and overdue
- Task Type Distribution: See breakdown of recurring vs one-time maintenance tasks
- Health Score: Overall maintenance health metric based on on-time completion rates
These statistics help you identify trends, improve maintenance planning, and ensure equipment reliability.
Related: Equipment Management, Logs & Activity
Documents
Store and organize all equipment-related documents in one place.
Uploading Documents
Keep all equipment documentation organized and accessible. Upload manuals, certificates, drawings, and any other important files.
- Navigate to the equipment profile
- Scroll to the Documents section
- Click "Add Document" or the upload button
- Select the file from your device (see supported file types below)
- Enter a descriptive name for the document
- Check your storage quota before uploading (shown in the upload dialog)
- Click "Upload" to save the document
Storage limits: Each subscription plan has a storage quota. If you exceed your quota, you'll need to delete old documents or upgrade your plan. You can check your current usage in Settings → Usage. Additionally, Free plan users have a limit of 5 documents per equipment. Starter and higher plans have unlimited documents per equipment.
Supported File Types
EquipPanel accepts the following file types for document uploads:
- Documents: PDF (.pdf), Word (.doc, .docx), Excel (.xls, .xlsx), Text (.txt), CSV (.csv)
- Images: JPEG (.jpg, .jpeg), PNG (.png), GIF (.gif), WebP (.webp)
- Archives: ZIP (.zip), RAR (.rar)
File size limit: Maximum file size is 25MB per file. Files are validated for security to ensure safe uploads.
Organizing Documents
Documents are automatically organized by equipment. Each equipment has its own document folder. You can:
- Rename documents for better organization (Admin only)
- View documents directly in the browser (for PDFs and images)
- Download documents when needed
- Delete documents you no longer need (Admin only)
Documents are organized by equipment, making it easy to find all documentation for a specific piece of equipment. When you scan a QR code, all documents for that equipment are immediately accessible.
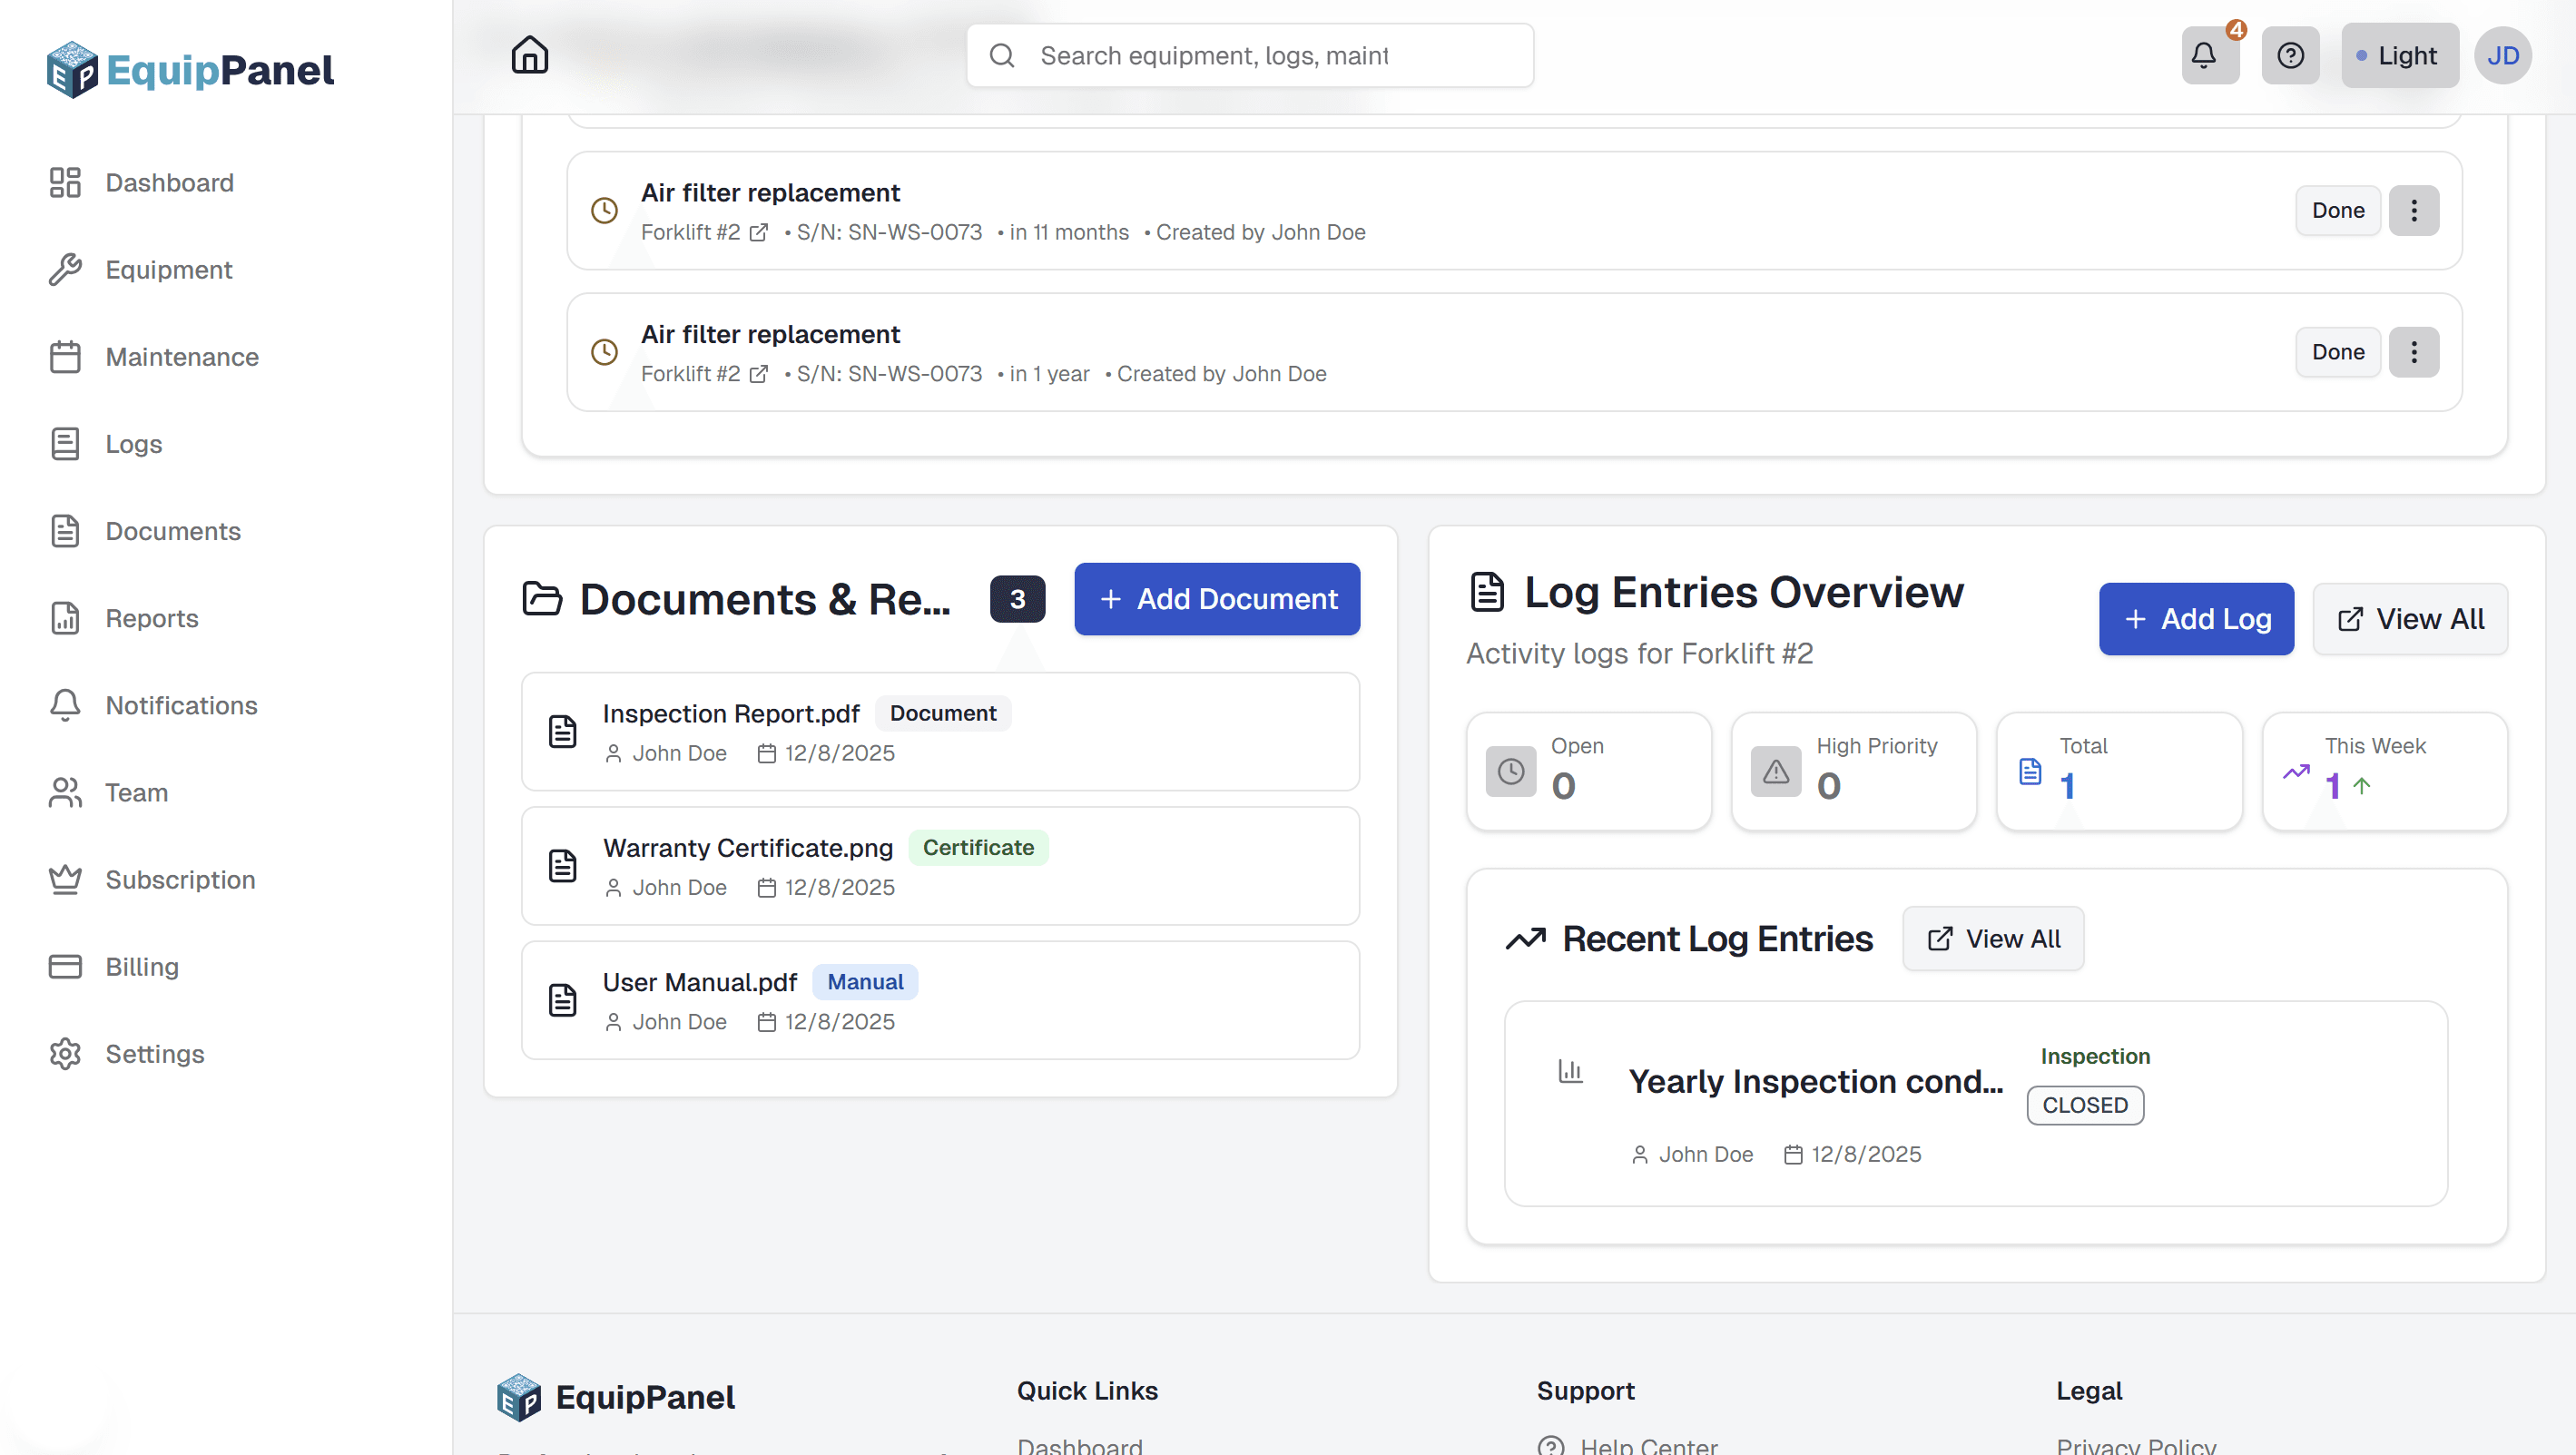
Documents Dashboard
The Documents Dashboard provides a centralized view of all documents across all your equipment:
- Analytics: View total documents, total storage used, documents by type, and recent uploads
- Filtering: Filter documents by equipment, file type, date range, or uploader
- Search: Search documents by name or associated equipment
- Storage Tracking: Monitor your storage usage and see how much space your documents are using
- Bulk Management: View, download, rename, or delete multiple documents from one place
Access the Documents Dashboard from the main navigation menu. This is especially useful when you need to find a document but don't remember which equipment it's associated with.
Downloading Documents
To download a document, click the download icon next to the document name. Documents can be downloaded individually or accessed directly from the equipment profile when scanning QR codes.
Document Types
Common document types you might upload include:
- Manuals: User manuals, technical specifications, operating instructions
- Certificates: Calibration certificates, compliance documents, warranty certificates
- Drawings: Technical drawings, schematics, wiring diagrams
- Photos: Equipment photos, damage documentation, installation photos
- Other: Any other relevant documentation for the equipment
All documents are stored securely and count toward your storage quota based on your subscription plan.
Related: Equipment Management, QR Codes
Reports
Generate professional reports for equipment, maintenance, and activity data.
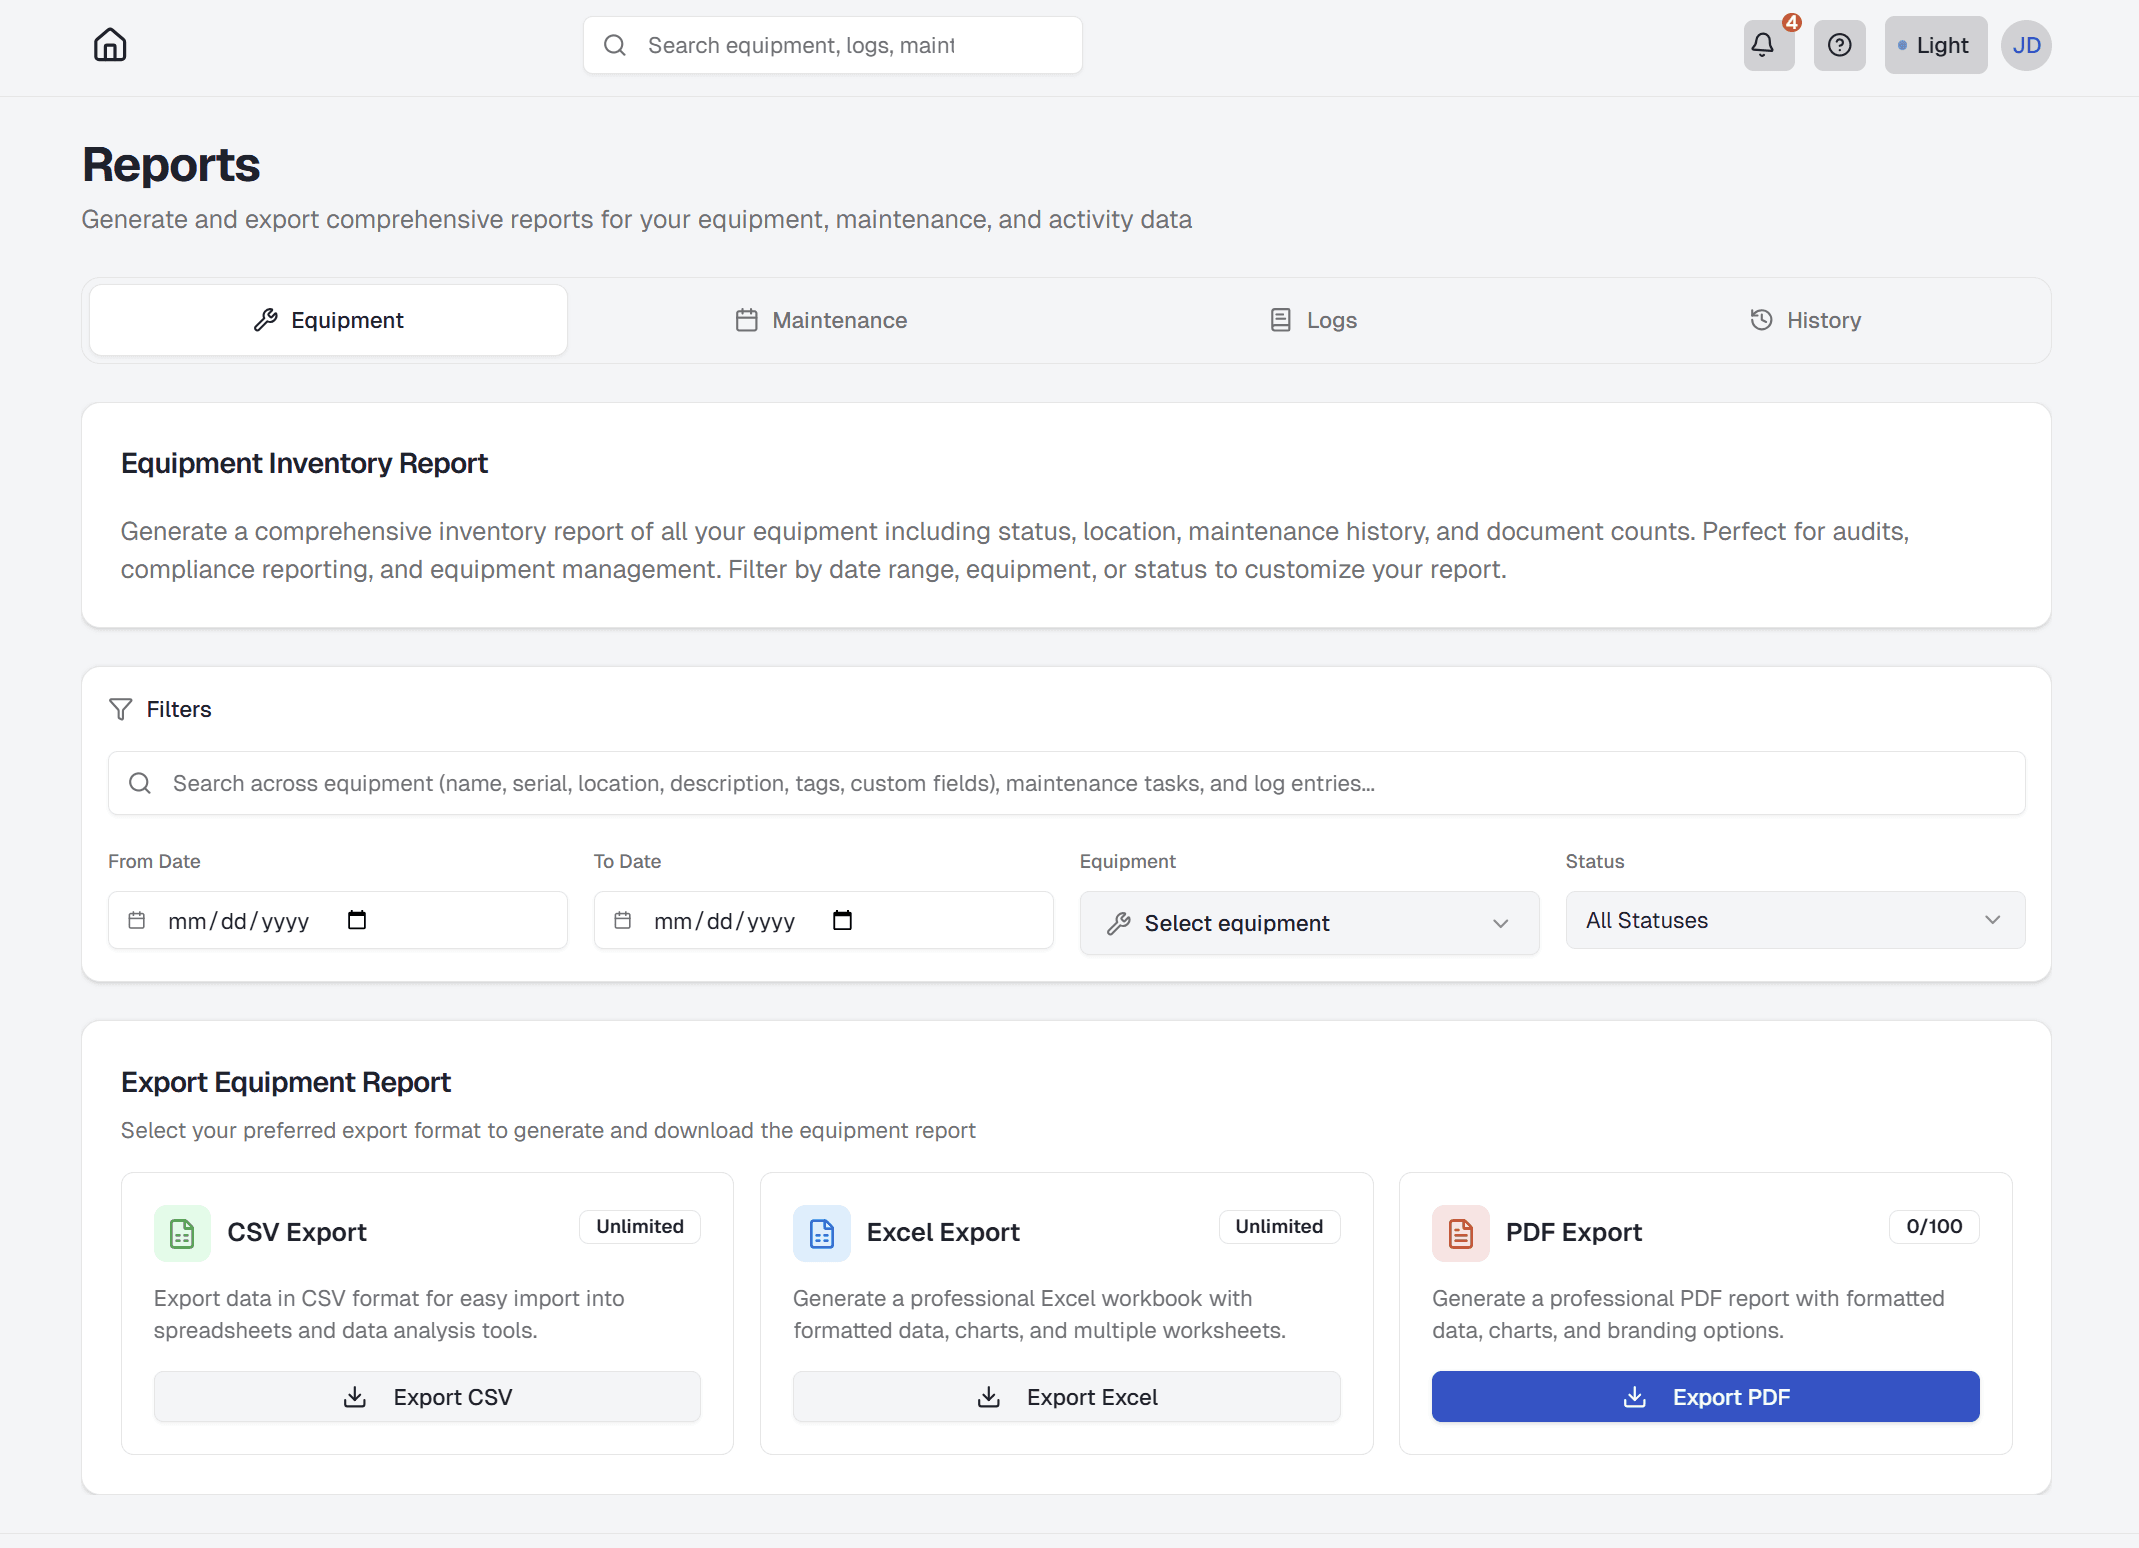
Generating Reports
Create comprehensive reports to analyze your equipment data, track maintenance, and review activity. Reports can be exported in multiple formats for sharing or analysis.
- Navigate to the Reports page from your dashboard
- Select the report type (Equipment, Maintenance, or Activity)
- Choose your date range and filters (equipment, status, location, tags)
- Customize which fields to include in the report using the field selector
- Save your field selection as a template for future reports (optional)
- Select your export format (PDF, Excel, or CSV)
- Check your export quota if generating PDF reports
- Click "Generate Report" and wait for processing
- Download the report when it's ready
Tip: Save your field selections as a template to quickly generate similar reports in the future.
Report Types
EquipPanel offers three main report types:
- Equipment Reports: Inventory lists, utilization metrics, status summaries, and equipment details. You can filter by specific equipment or export all equipment data.
- Maintenance Reports: Schedule overviews, maintenance history, effectiveness analysis, and cost tracking
- Activity Reports: Log entries, activity tracking, user activity, and timeline views
Field Customization
Customize which fields appear in your reports to focus on the information that matters most to you:
- Field Selection: Choose from categorized fields including Basic Info, Status & Location, Maintenance, Documents, and Custom Fields
- Default Fields: Each report type comes with a default set of recommended fields
- Field Categories: Fields are organized by category to make selection easier
- Real-time Preview: See how many fields you've selected as you customize your report
Field customization lets you create reports tailored to your specific needs, whether you need a quick overview or a comprehensive detailed report.
Report Templates
Save time by creating and reusing report templates:
- Save Templates: Save your field selections and filter configurations as reusable templates
- Apply Templates: Quickly apply a saved template to generate similar reports
- Template Management: Create, edit, and delete templates as your reporting needs change
- Default Templates: Start with pre-configured templates for common use cases
Templates are especially useful when you need to generate the same type of report regularly, such as monthly equipment inventory reports or weekly maintenance summaries.
Export Formats
Choose the format that works best for your needs:
- PDF: Professional reports with charts, branding, and formatting. Perfect for presentations and audits. (Quota-limited based on plan)
- Excel: Multi-worksheet reports with professional styling. Great for data analysis and manipulation. (Available on Starter+ plans)
- CSV: Unlimited data export for spreadsheet analysis. Works with any spreadsheet software. (Unlimited on all plans)
Report History
Pro and Enterprise plan users can access their report history:
- View all previously generated reports
- Re-download reports without regenerating
- Track report generation over time
- Manage storage by deleting old reports
Report history helps you keep track of your data exports and saves time by avoiding duplicate report generation.
Related: Equipment Management, Maintenance Scheduling
Team Management
Invite team members and manage permissions to control who can access and modify your equipment data.
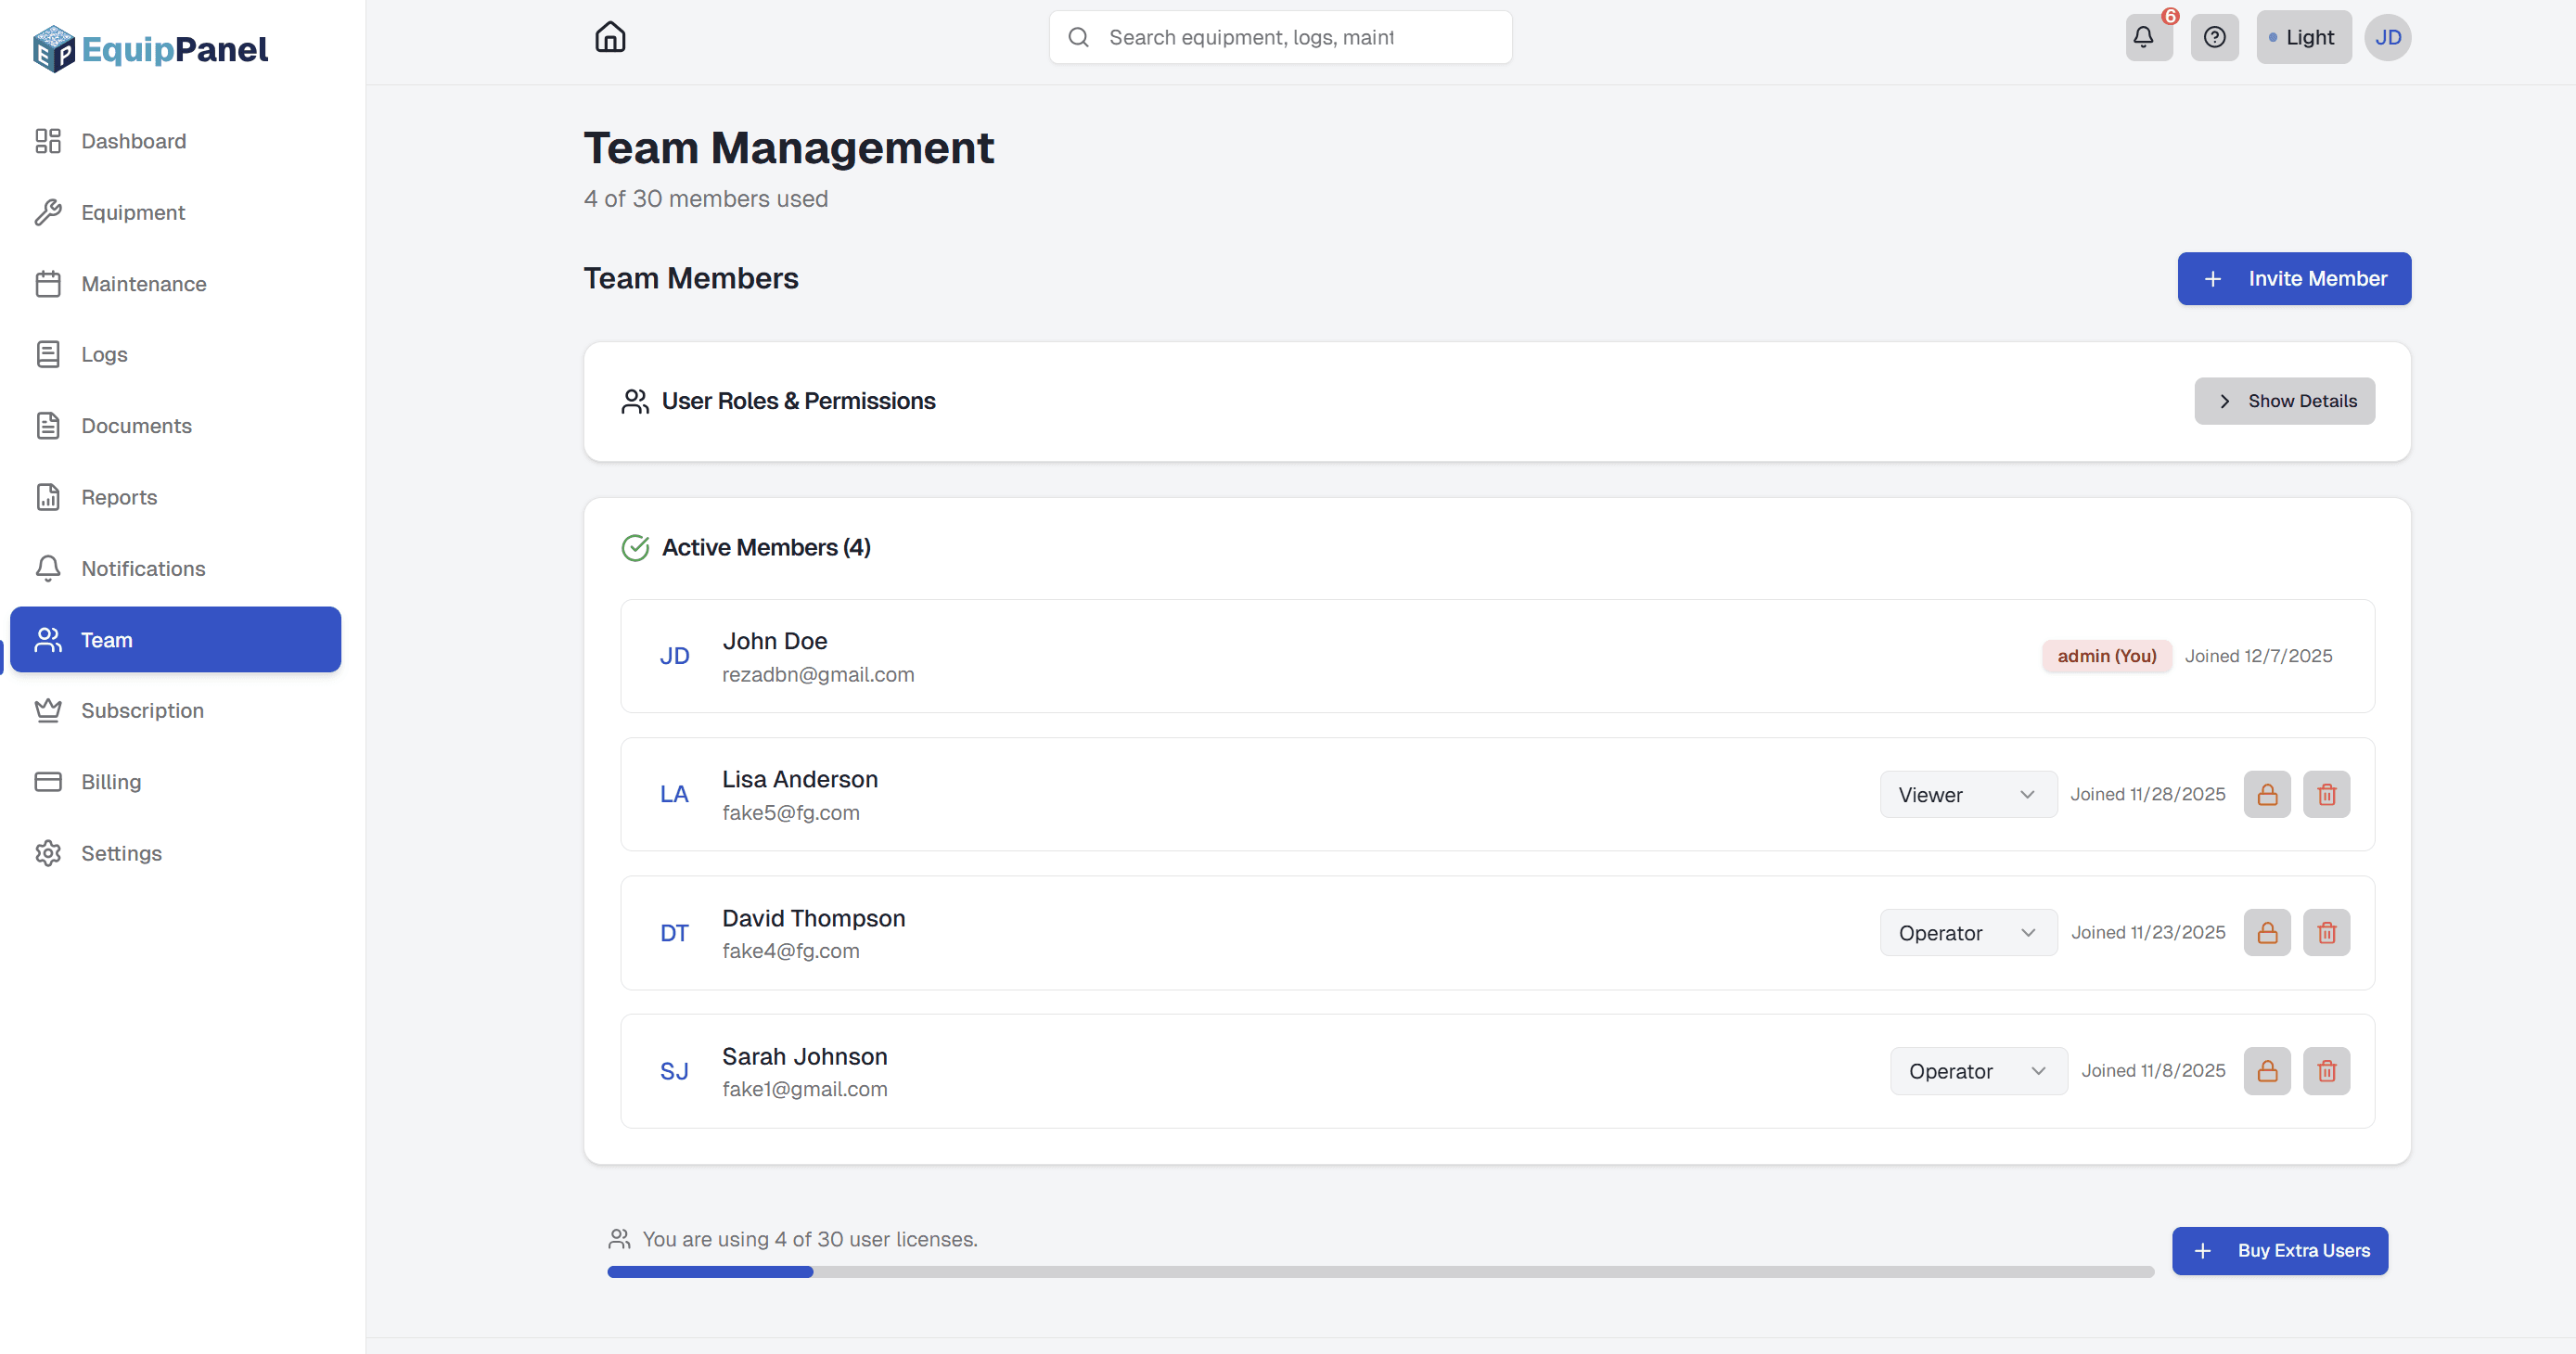
Inviting Team Members
Add team members to your EquipPanel account so they can access equipment information and contribute to logs.
- Go to the Team page from your dashboard
- Click "Invite Team Member"
- Enter the team member's email address
- Select their role (Admin, Operator, or Viewer)
- Click "Send Invitation"
- The team member receives an email with an invitation link
- They click the link to accept and create their account
User Roles
EquipPanel has three user roles with different permission levels:
- Admin: Full control over all features. Can create/edit/delete equipment, manage team members, access billing, configure settings, and receive email notifications.
- Operator: Can update equipment status, create/edit/delete their own logs, create maintenance schedules, mark maintenance as done, and upload documents. Can view notifications but cannot manage team, billing, or receive email notifications.
- Viewer: Read-only access. Can view equipment, logs, documents, and notifications but cannot make any changes. Cannot access billing or team information. Perfect for auditors or external partners.
Note: Only admins receive email notifications. Operators and viewers receive in-app notifications only.
Managing Permissions
As an Admin, you can:
- Change a user's role at any time
- Activate or deactivate users (deactivated users cannot log in)
- Remove users from your team
- View when users last logged in
Activating and Deactivating Users
Temporarily disable access without deleting a user:
- Go to the Team page
- Find the user you want to deactivate
- Click "Deactivate" (or "Activate" to restore access)
- Deactivated users cannot log in but their data remains in the system
Related: Getting Started
Notifications
Stay informed about equipment activity, maintenance, and important updates with real-time notifications.
How Notifications Work
EquipPanel automatically creates notifications for important events across your equipment. All team members can see notifications, keeping everyone informed about equipment status, maintenance, and incidents.
Notifications appear in real-time in the notification bell icon in the header, and you can view all notifications on the Notifications page.
Notification Types
You'll receive notifications for:
- Maintenance alerts: When maintenance is due or overdue
- Equipment incidents: High-priority logs and equipment issues
- Status changes: When equipment status changes (e.g., to "Out of Service")
- Document uploads: When new documents are added to equipment
- Team activity: When team members are added, removed, or roles change
- Storage warnings: When you're approaching your storage quota limit
Viewing Notifications
Access notifications in two ways:
- Notification dropdown: Click the bell icon in the header to see recent notifications
- Notifications page: Go to the Notifications page from your dashboard to see all notifications with filtering options
Notifications are automatically marked as read when you view them, or you can manually mark them as read/unread.
Email Notifications
Email notifications are available on Starter, Business, Pro, and Enterprise plans. Only admins receive email notifications:
- Immediate emails: Get instant email alerts for urgent notifications (maintenance overdue, incidents)
- Daily digest: Receive a summary email once per day with all notifications
- Customizable: Control which notification types trigger emails in your notification preferences
Configure email preferences in Settings → Notifications. You can choose immediate emails, daily digest, or disable email notifications while still receiving in-app notifications.
Notification Preferences
Customize how you receive notifications:
- Go to Settings → Notifications from your dashboard
- Choose which notification categories you want to receive
- Set email preferences (if you're an admin on a plan that supports email notifications)
- Choose between immediate emails or daily digest
- Save your preferences
All users can view and manage their in-app notification preferences. Only admins can configure email notifications.
Managing Notifications
All users can:
- View all notifications
- Mark notifications as read or unread
- Filter notifications by category, priority, or date
Only admins can delete notifications. Notifications older than 30 days are automatically removed.
Related: Maintenance Scheduling, Team Management
Settings & Account
Manage your account, company settings, and preferences to customize EquipPanel for your workflow.
Account Settings
Manage your personal account information:
- Profile information: Update your name, email address, and profile photo
- Password: Change your account password
- Email preferences: Update your email address (requires verification)
- Account deletion: Delete your account and all associated data
Access account settings from Settings → Account in your dashboard.
Company Settings
Admins can configure company-wide settings:
- Company name: Update your company name
- Company logo: Upload a logo that appears in reports and branding
- Currency: Set your preferred currency for billing and reports
- Equipment statuses: Customize status options to match your workflow
- Default locations: Set up common locations for quick selection
Company settings affect all team members and are only accessible to admins.
Notification Preferences
Control how you receive notifications:
- Go to Settings → Notifications
- Choose which notification categories you want to receive
- Set email preferences (if you're an admin on a plan that supports email notifications)
- Choose between immediate emails or daily digest
- Save your preferences
Notification preferences are personal to each user. Admins can receive email notifications; operators and viewers receive in-app notifications only.
Storage & Usage
Monitor your storage usage and quotas:
- Storage quota: View your current storage usage and limits
- Usage breakdown: See how much storage is used by documents, log attachments, and reports
- Quota warnings: Receive notifications when approaching storage limits
- Plan limits: Understand your plan's storage limits and upgrade options
Storage quotas are based on your subscription plan. You can purchase additional storage as an add-on (Business and Pro plans). All files (documents, log attachments, reports) count toward your total storage.
Data Export & Backup
Export your data using the Reports page:
- Go to Dashboard → Reports
- Select the report type (Equipment, Maintenance, or Activity)
- Configure filters and field selections as needed
- Choose export format (CSV, Excel, or PDF)
- Generate and download your report
You can export equipment, maintenance, and activity data in CSV, Excel, or PDF formats. CSV exports are unlimited on all plans. Excel and PDF exports are available on Starter+ plans with quota limits. All data is automatically backed up with point-in-time recovery.
Related: Notifications, Subscriptions & Billing
Subscriptions & Billing
Understand your subscription plan, manage billing, and learn about upgrades and add-ons.
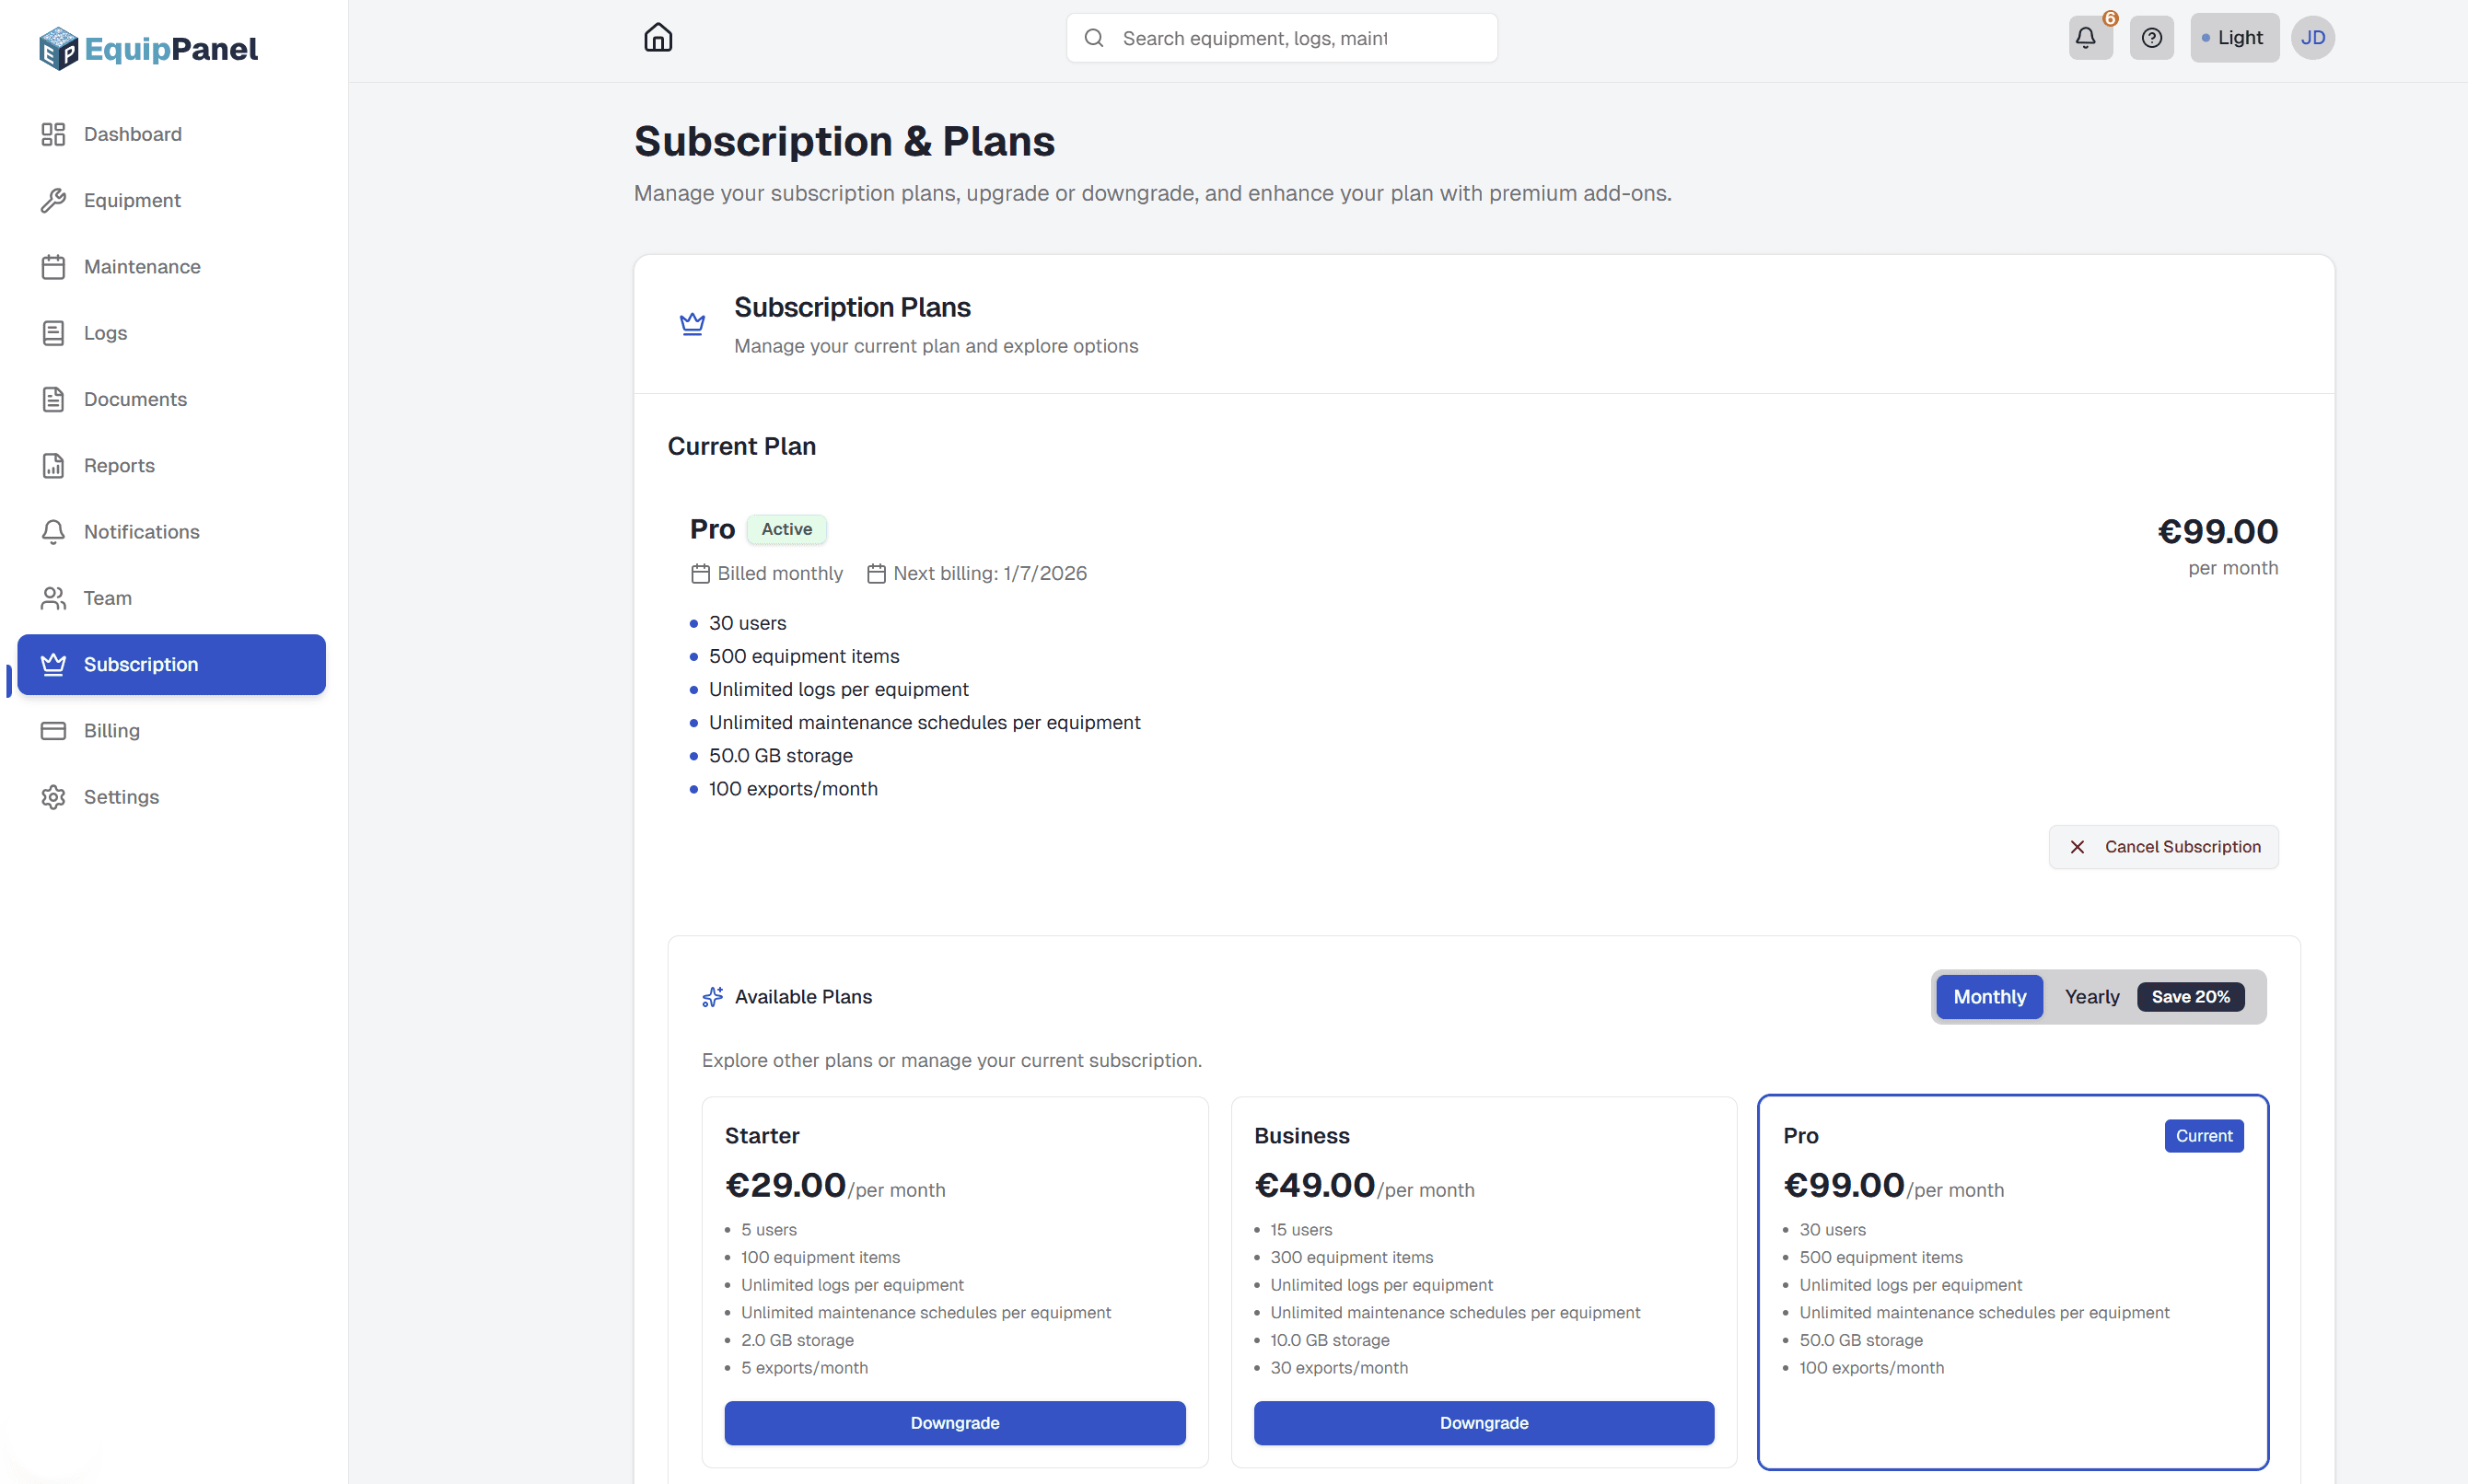
Understanding Plans
EquipPanel offers several subscription plans to fit different team sizes and needs:
- Free: Perfect for trying EquipPanel. Includes 1 user, 10 equipment, 5 logs per equipment, 5 maintenance schedules per equipment, 5 documents per equipment, 50 MB storage, unlimited CSV exports, no PDF/Excel exports, no report history, no team collaboration.
- Starter (€29/month): For small teams. Includes 5 users, 100 equipment, unlimited logs, unlimited maintenance, unlimited documents, 2 GB storage, PDF exports (5/month), Excel exports, team management, no report history.
- Business (€49/month): For growing teams. Includes 15 users, 300 equipment, unlimited logs, unlimited maintenance, unlimited documents, 10 GB storage, PDF exports (30/month), report history, email notifications with customizable preferences (admin only), QR-code branding, PDF report branding, company-wide team notifications, priority support, and add-ons.
- Pro (€99/month): For larger operations. Includes 30 users, 500 equipment, unlimited logs, unlimited maintenance, unlimited documents, 50 GB storage, PDF exports (100/month), report history, email notifications with customizable preferences (admin only), QR-code branding, PDF report branding, company-wide team notifications, priority support, and add-ons.
- Enterprise: Custom plans for large organizations with unlimited users, equipment, custom storage, unlimited exports, SLA-backed support, custom onboarding, and dedicated support.
Upgrading and Downgrading
You can change your plan at any time:
- Upgrades: Take effect immediately. You'll be charged a prorated amount for the remainder of your billing period.
- Downgrades: Take effect at the end of your current billing period. You keep full access to your current plan until then.
- Data Safety: When downgrading, data beyond your new plan limits becomes locked (view-only) but is not deleted. You have 90 days to upgrade again to unlock it.
Add-Ons
Business and Pro plan users can purchase add-ons to extend their limits:
- Extra User License: Add 1 additional user (€3/month or €30/year)
- Extra Equipment (+50): Add 50 additional equipment (€5/month or €50/year)
- Extra Storage (10 GB): Add 10 GB additional storage (€5/month or €50/year)
- Additional Exports (50 PDFs): Add 50 additional PDF exports per month (€5/month or €50/year)
Add-ons can be added or removed at any time. Changes take effect immediately with prorated billing.
Billing History
Access your billing history and invoices:
- Go to the Billing page from your dashboard
- View all past invoices and payments
- Download invoices as PDFs
- Update payment methods through the customer portal
- View upcoming billing dates and amounts
- Update your billing address and contact information
Storage Quotas
Each plan includes a storage quota that limits the total size of all files:
- What counts: All documents, log attachments, and generated reports count toward your storage quota
- Quota enforcement: You cannot upload files that would exceed your quota
- Monitoring: Check your current usage in Settings → Usage
- Warnings: You'll receive notifications when approaching your storage limit
- Upgrading: Purchase Extra Storage add-ons (Business and Pro plans) or upgrade to a higher plan
Storage is calculated in megabytes (MB). You cannot upload files that would exceed your quota.
Related: Team Management
Progressive Web App (PWA)
Install EquipPanel as a Progressive Web App for a native-like experience on mobile and desktop devices.
What is a Progressive Web App?
EquipPanel can be installed as a Progressive Web App (PWA), giving you a native app-like experience directly from your web browser. Once installed, EquipPanel runs in fullscreen mode without browser UI, making it feel like a native mobile or desktop application.
- Fullscreen experience - No browser UI, just your equipment management app
- Fast access - Launch from your home screen or desktop like a native app
- Native feel - Works offline-ready and provides a smooth, app-like experience
- Offline-ready - Access your equipment data even when connectivity is limited
Installing EquipPanel as a PWA
Installation steps vary by platform. Follow the instructions for your device:
Android (Chrome/Edge)
- Open Chrome or Edge browser on your Android device
- Visit equippanel.com and log in to your account
- A prompt will appear asking if you want to install the app
- Click "Install" or tap the install icon in the address bar
- Accept the installation when prompted
- The app will be installed and appear on your home screen
iOS (Safari)
- Open Safari browser on your iPhone or iPad
- Visit equippanel.com and log in to your account
- Tap the Share button (square with arrow) at the bottom of Safari
- Select "Add to Home Screen" from the share menu
- The app will be added to your home screen with an EquipPanel icon
Windows (Chrome/Edge)
- Open Chrome or Edge browser on your Windows computer
- Visit equippanel.com and log in to your account
- A prompt will appear asking if you want to install the app
- Click "Install" in the prompt or use the install icon in the address bar
- Accept the installation when prompted
- The app will be installed and appear in your Start menu and can create a desktop shortcut
Mac (Safari)
- Open Safari browser on your Mac
- Visit equippanel.com and log in to your account
- Click the Share button in Safari's toolbar
- Select "Add to Home Screen" from the share menu
- The app will be added to your Applications folder and Launchpad
PWA Features
Fullscreen Mode
EquipPanel runs in fullscreen mode without browser UI, providing a clean, app-like experience.
Fast Access
Launch EquipPanel directly from your home screen or desktop, just like a native app.
Native App Feel
Smooth animations, responsive design, and optimized performance make EquipPanel feel like a native application.
Multilingual Support
All PWA features work seamlessly with EquipPanel's multilingual system (English and German).
Troubleshooting
Install Prompt Not Appearing
If you don't see an install prompt, check the following:
- Make sure you're using a supported browser (Chrome/Edge on Android/Windows, Safari on iOS/Mac)
- Ensure you're logged in to your EquipPanel account
- The app may already be installed - check your home screen or Start menu
iOS Manual Installation
iOS doesn't support automatic install prompts. You must manually use Safari's "Add to Home Screen" feature. The install prompt in the app will guide you through this process.
Icon Not Showing on Desktop (Windows)
If the desktop shortcut doesn't show an icon, try uninstalling and reinstalling the PWA. The icon should appear after reinstallation.
Browser Support
EquipPanel PWA is supported on the following platforms and browsers:
| Platform | Browser | Status |
|---|---|---|
| Android | Chrome, Edge, Samsung Internet | Full Support |
| iOS | Safari | Full Support |
| Windows | Chrome, Edge | Full Support |
| Mac | Safari | Full Support |
Install EquipPanel
Learn how to install EquipPanel as a PWA on Android, iOS, Windows, and Mac devices.
PWA Features
Discover the benefits of using EquipPanel as a Progressive Web App.
Related: Getting Started, Settings & Account